A friend of mine recently reached out to me to see if I could scan a cliff face for him and create a 3d model out of it. He’s a climber so he wanted something he could share with his other climber friends and collaborate on how they were going to tackle a climb in this area and if it’s possible. So I jumped in my Jeep and headed up past Donner Lake on old HWY 40 to check out the area and use my drone to create a scan of this area.
How do you scan a cliff face with your drone you may ask? Well it’s a matter of taking enough images at various angles with enough overlap from one image to the next and using a process called photogrammetry to process this data and turn it into something 3D.
Photogrammetry is the science and technology of obtaining reliable information about physical objects and the environment through the process of recording, measuring and interpreting photographic images and patterns of electromagnetic radiant imagery and other phenomena. Wikipedia
Basically take enough photos at various positions and angles with enough overlap from image to image then use some amazing software to create the data with it.
Luckily I have been doing this for some time so I was up for the challenge and I also wanted to take some additional photos of the area for them so they could view the actual area as a 360 Panorama as well as shown below. Best viewed on your desktop with this link. The embedded version scales the UI a bit. Use your mouse of finger to move around in the pano below.
So I ended up taking about 154 photos, the sun was out so that will cause shadows in various places and if you’re building this for a video game it’s best to do this on a cloudy or grey sky to eliminate as much shadows as possible.
I will try to do my best to explain the software I used and the end result that you can get. I’ll do this though screen shots taken from my process but I hope to do a full video in the future if there is enough interest, let me know in the comment section below if you would like to see a video.
Sketchfab low poly version. This was reduced from 3.7 million faces down to 228k. I don’t have a pro account so have to upload low poly versions.
Taking the Images
I used my Mavic 2 Pro to manual fly a vertical path with timed shots being taken every 5 seconds. Which then I ended up with 154 images.
Camera Settings: F-Stop 5.6, ISO 100, shutter speed 160, WB manual.
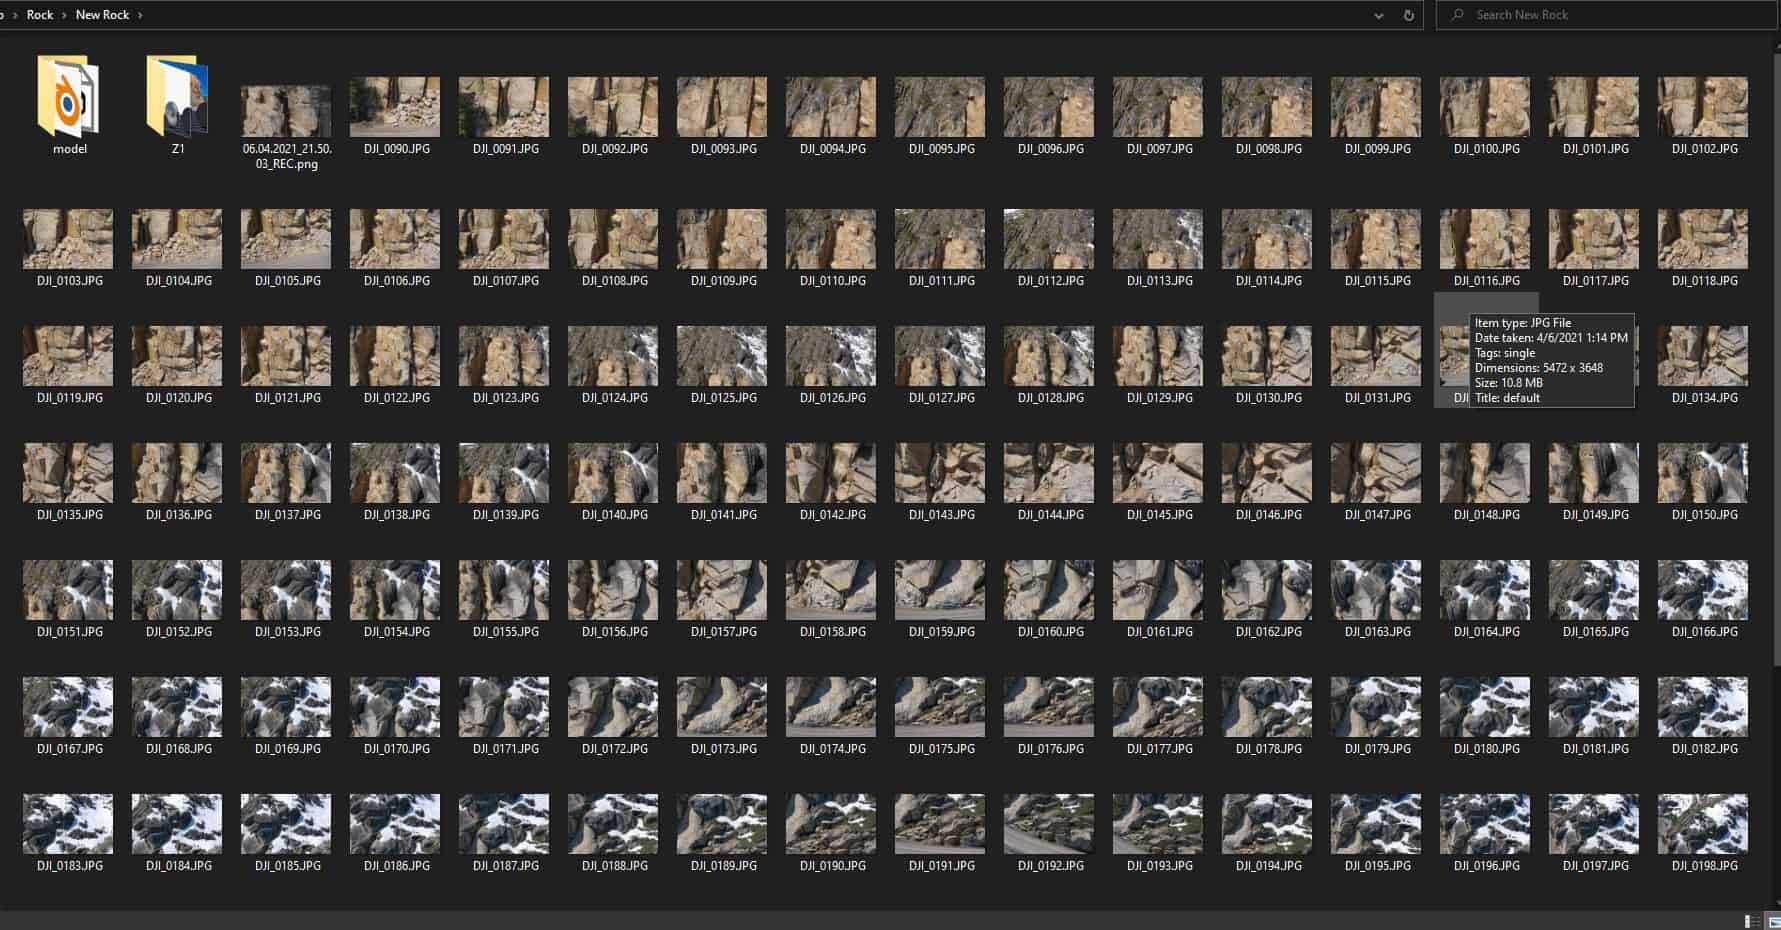
I didn’t really do any processing on these images in LightRoom since this wasn’t a paid gig, and looking though each photo 98% of them were very sharp, but I had a few blurry images that I removed. So remember when manually flying move the drone from spot to spot but give it a second or so to focus.
Photogrammetry Software – Metashape by Agisoft
This is my software of choice and have been using their software for several years now. This is a paid solution but you only need the basic version to do all the things however they do provide some sort of trial version as well.
The software is pretty easy to use and has simple workflow steps to follow to create your object.
- Add your Photos
- Workflow -> Align Photos
- Workflow -> Build Dense Point Cloud*
- Workflow -> Build Mesh
- Workflow -> Build Texture
Those are the basic steps and depending on your computer’s cpu, ram and gpu and the number of images can take hours.
Aligning the photos checks how well each photo matches to the next so it can then use all the photos to match points and create a point cloud.
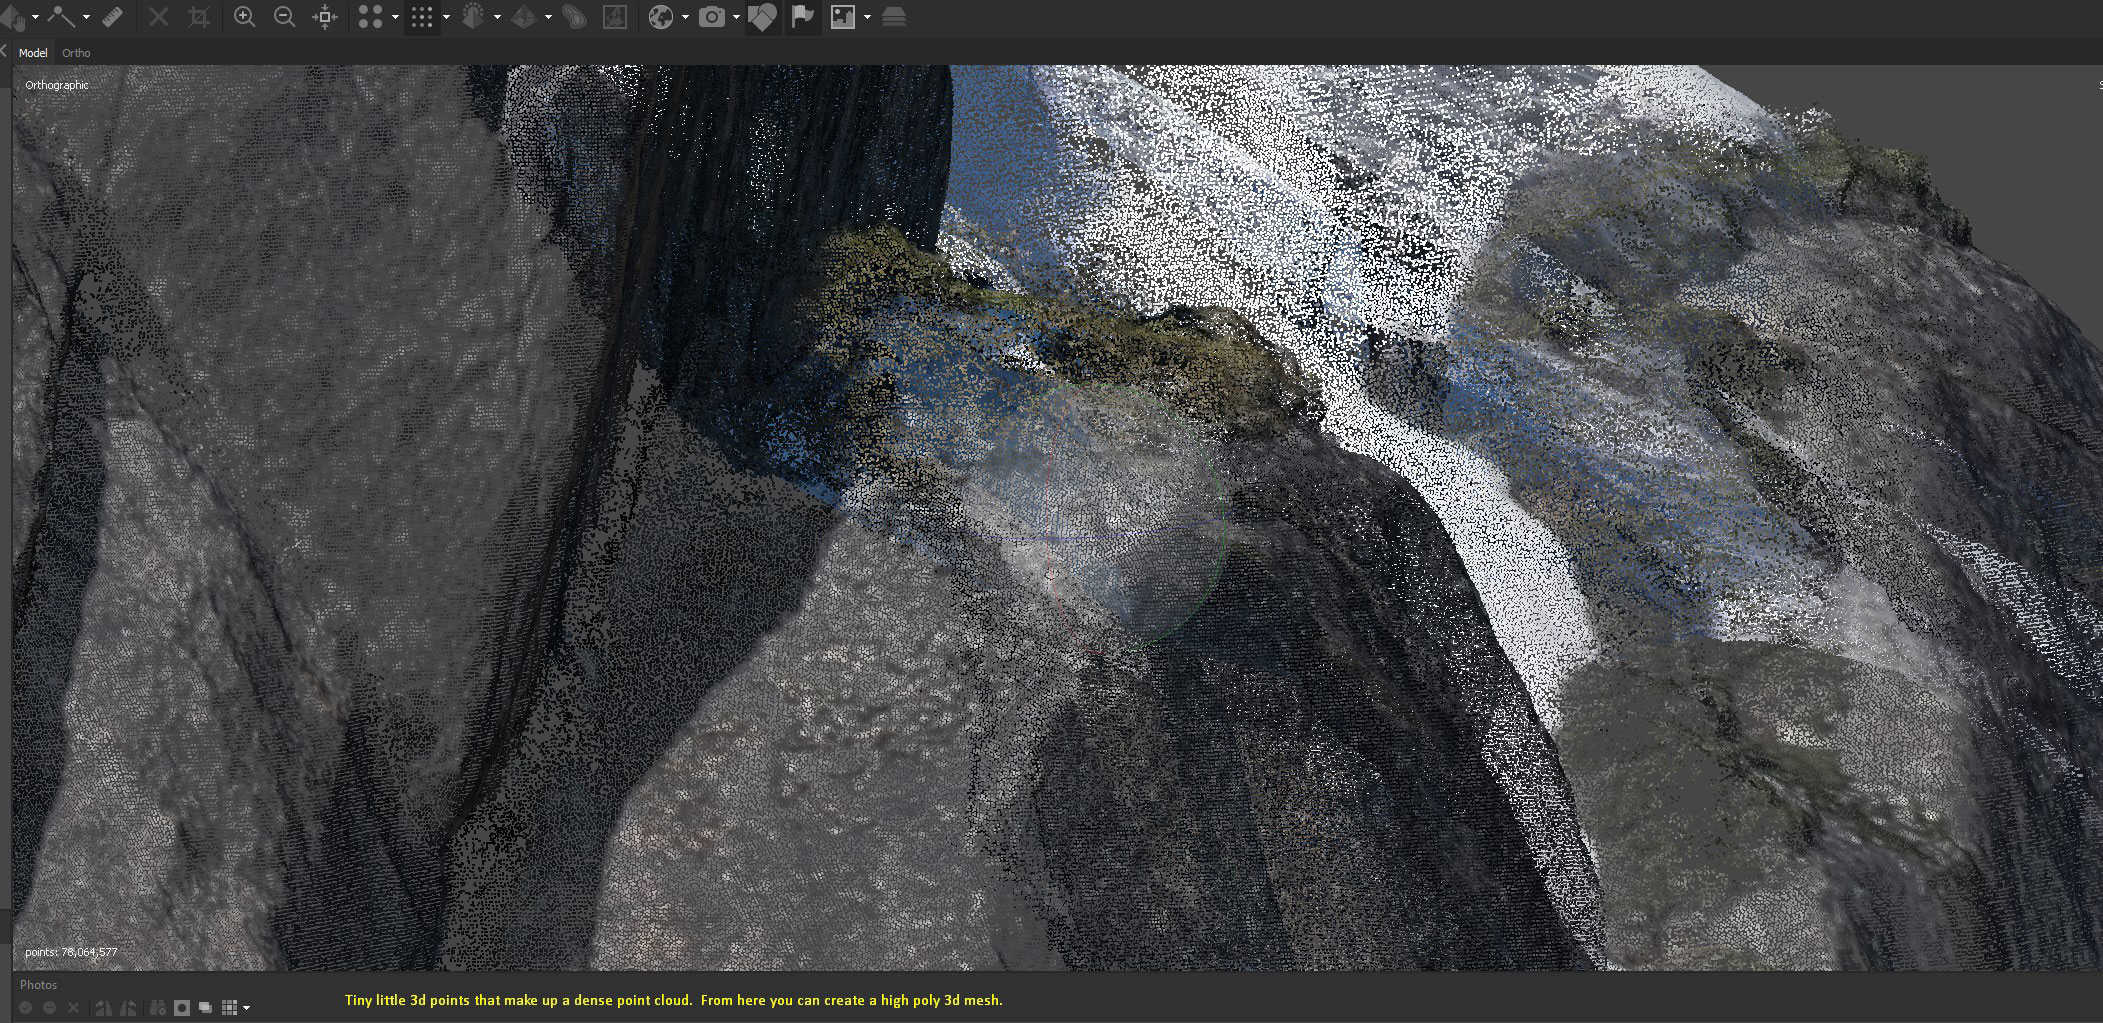
*A point cloud is a set of data points in space. The points represent a 3D shape or object. Each point has its set of X, Y and Z coordinates. Point clouds are generally produced by 3D scanners or by photogrammetry software, which measure many points on the external surfaces of objects around them. Wikipedia
[rl_gallery id=”1068″]
Next step would be to build a dense point cloud which adds millions of points and hopefully this starts to show the depth of the object you scanned in 3d space.
This process can take quite some time depending on what you select for your settings. I use high or ultra high depending on what I’m scanning and in the case of this cliff it took about 47 minutes to process which created 78 million points in 3d space.
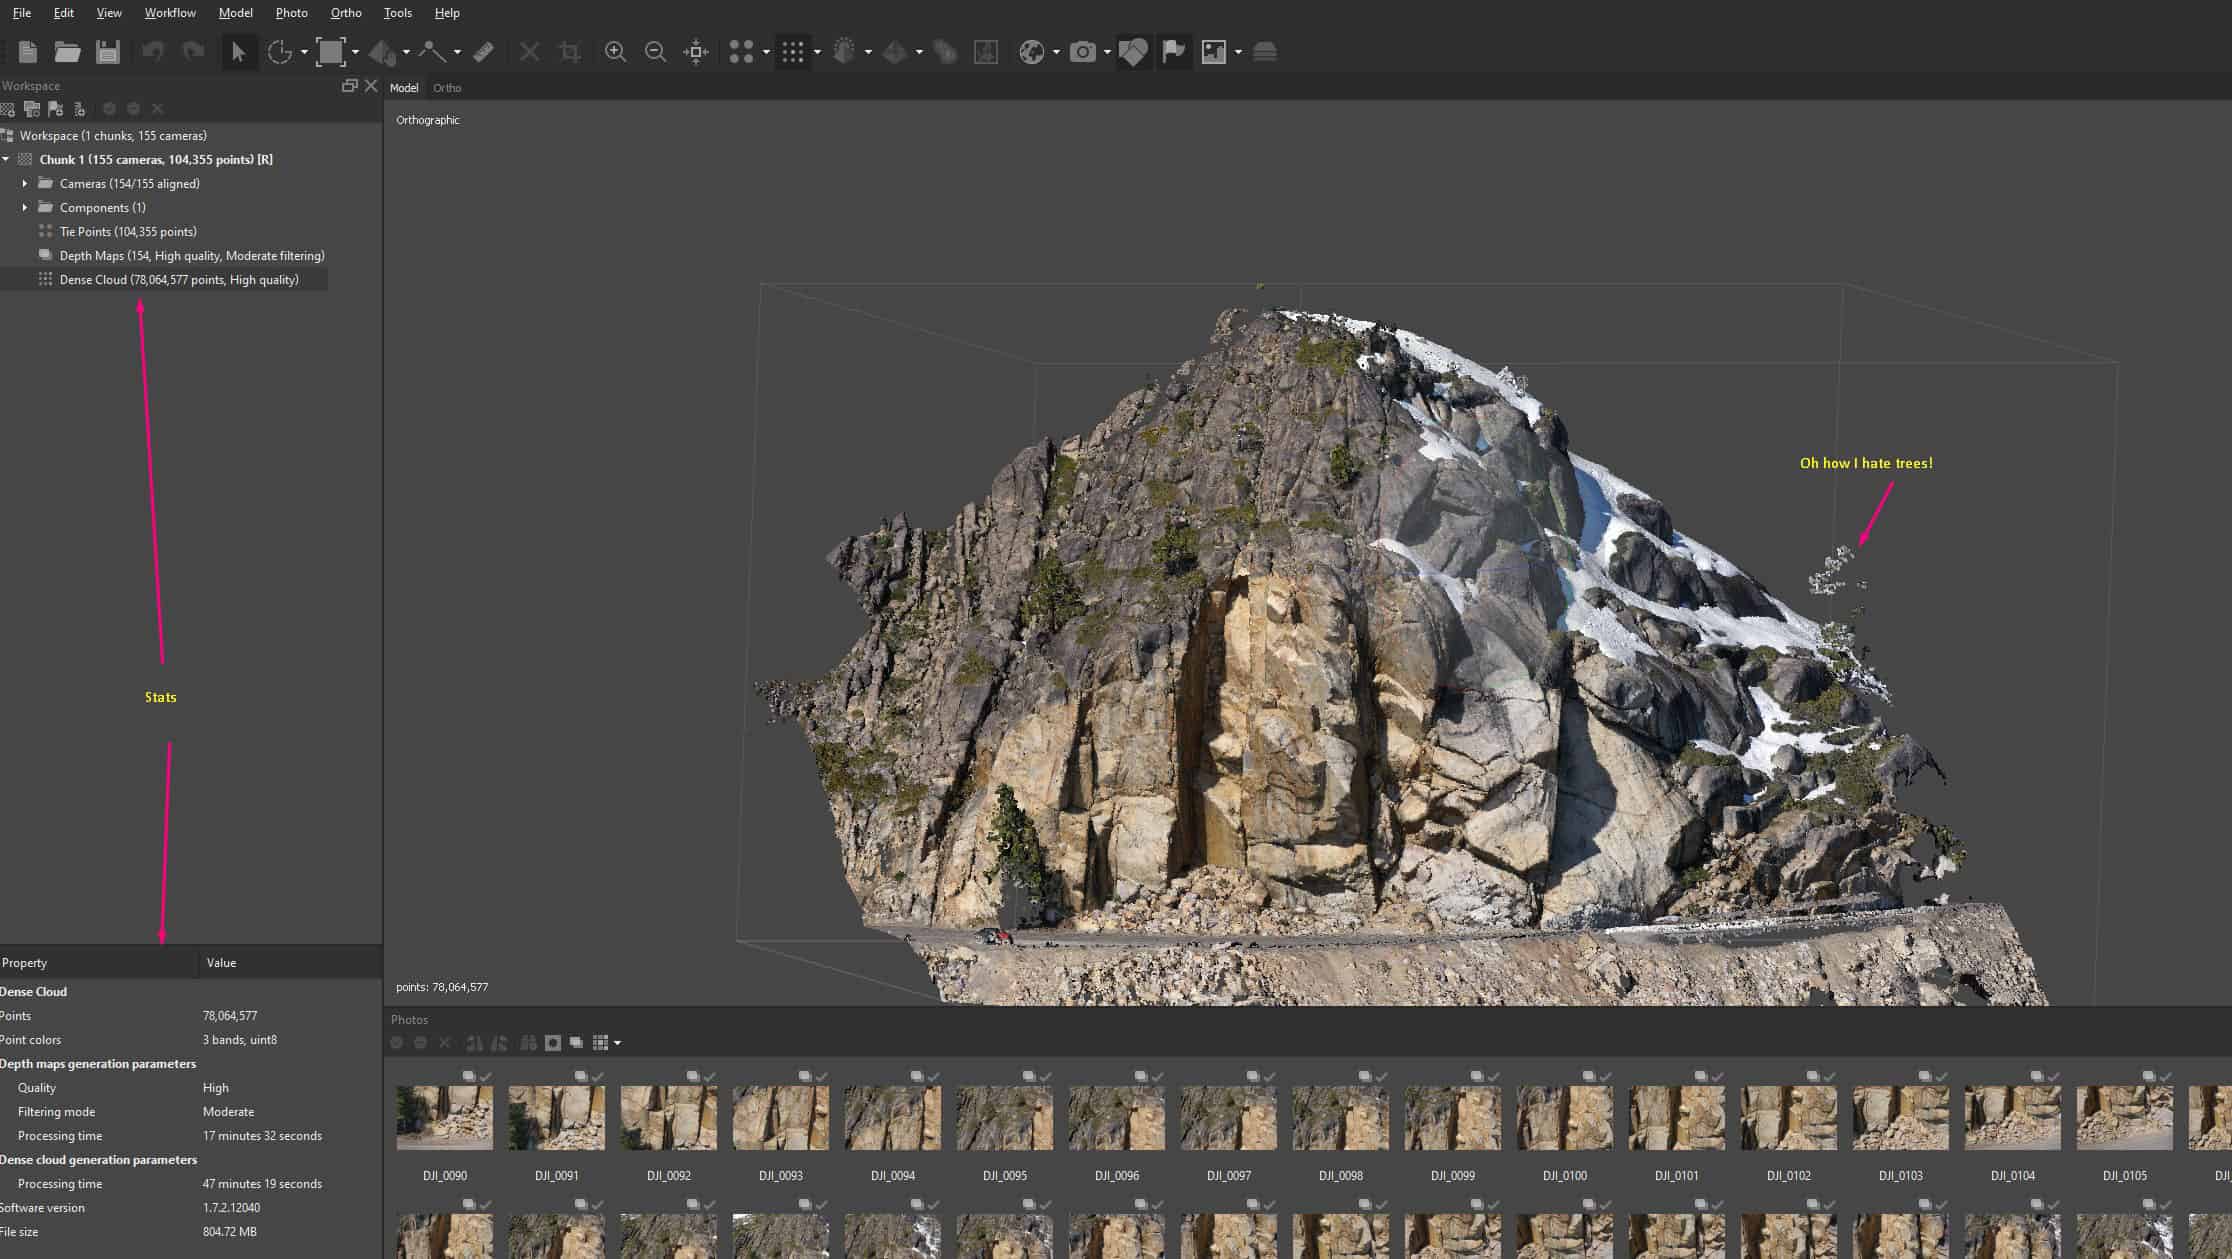
So before I go on, I will usually spend time removing points from the point cloud. For example the photogrammetry process has a hard time with full trees so I will use the selection tools to remove those points.
You have 3 options for selection: Box, Circle and Freeform.

After cleaning all the extraneous points that you really don’t need you can then go onto the next step to build your mesh.
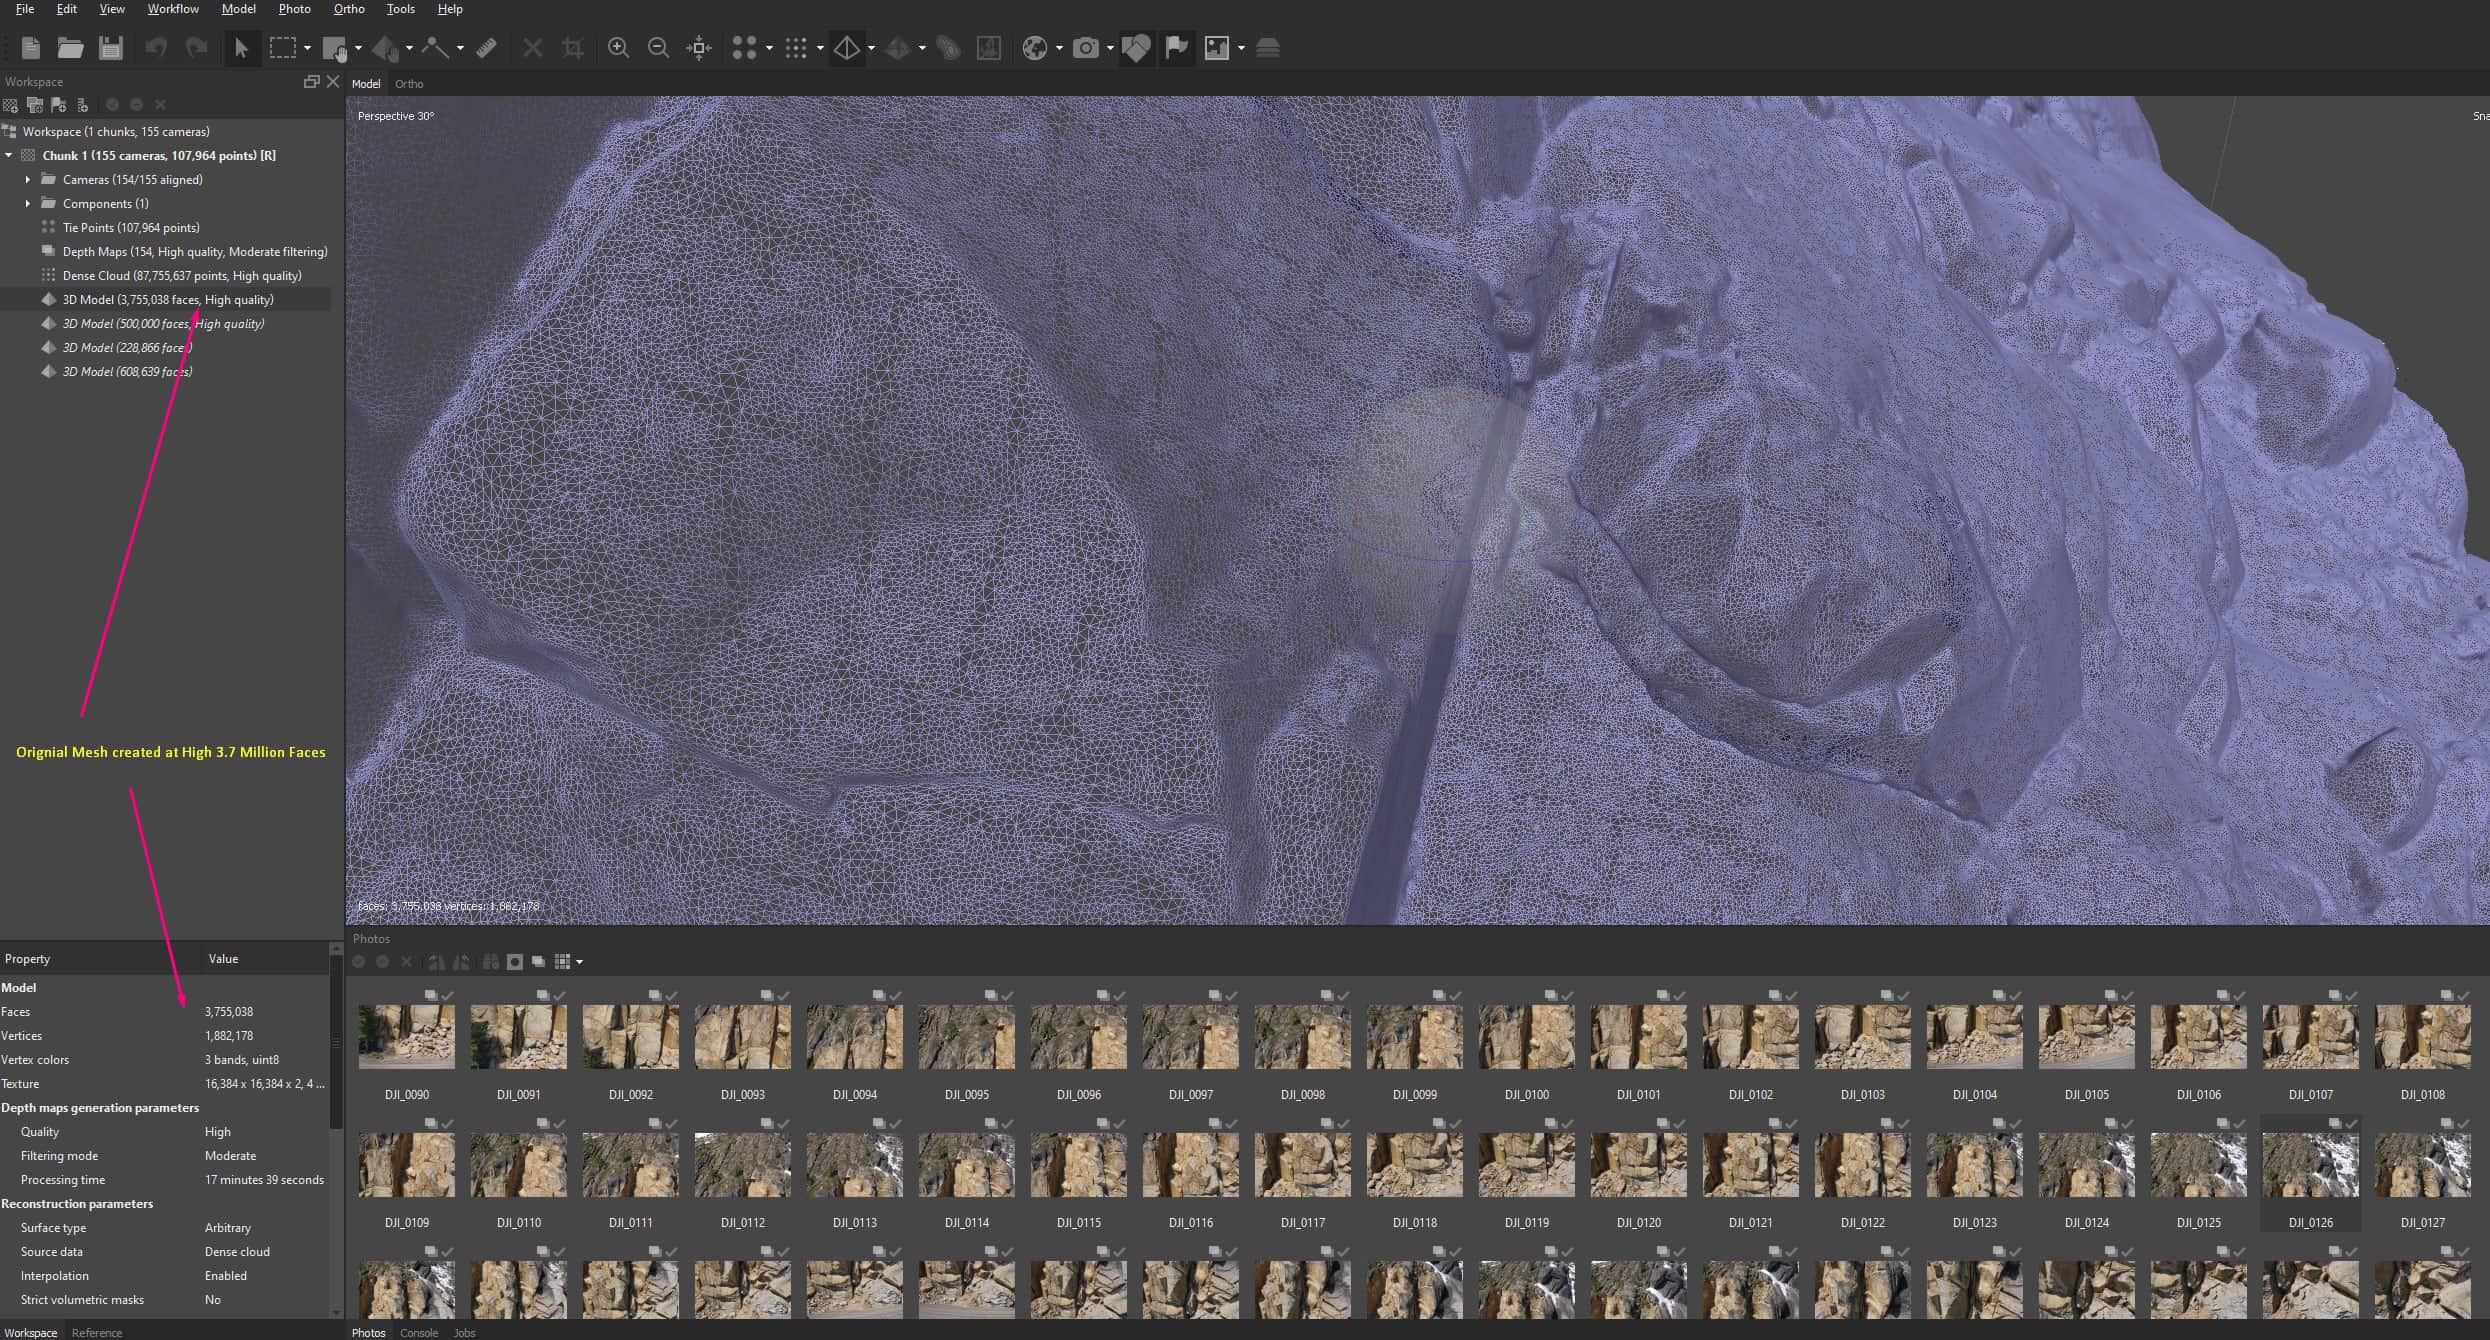
This process took close to 2 hours on my computer and it created almost 3.7 million faces. I was pretty amazed at the mesh results especially after I built the texture for it, which is the last step in this process.
After the mesh I went though the last step and generated a 16k texture map from the original images. This took about 30 minutes to complete. You can experiment with 2k, 4k and 8k sizes, it’s really going to depend on how big or small your object is and how much quality you want.

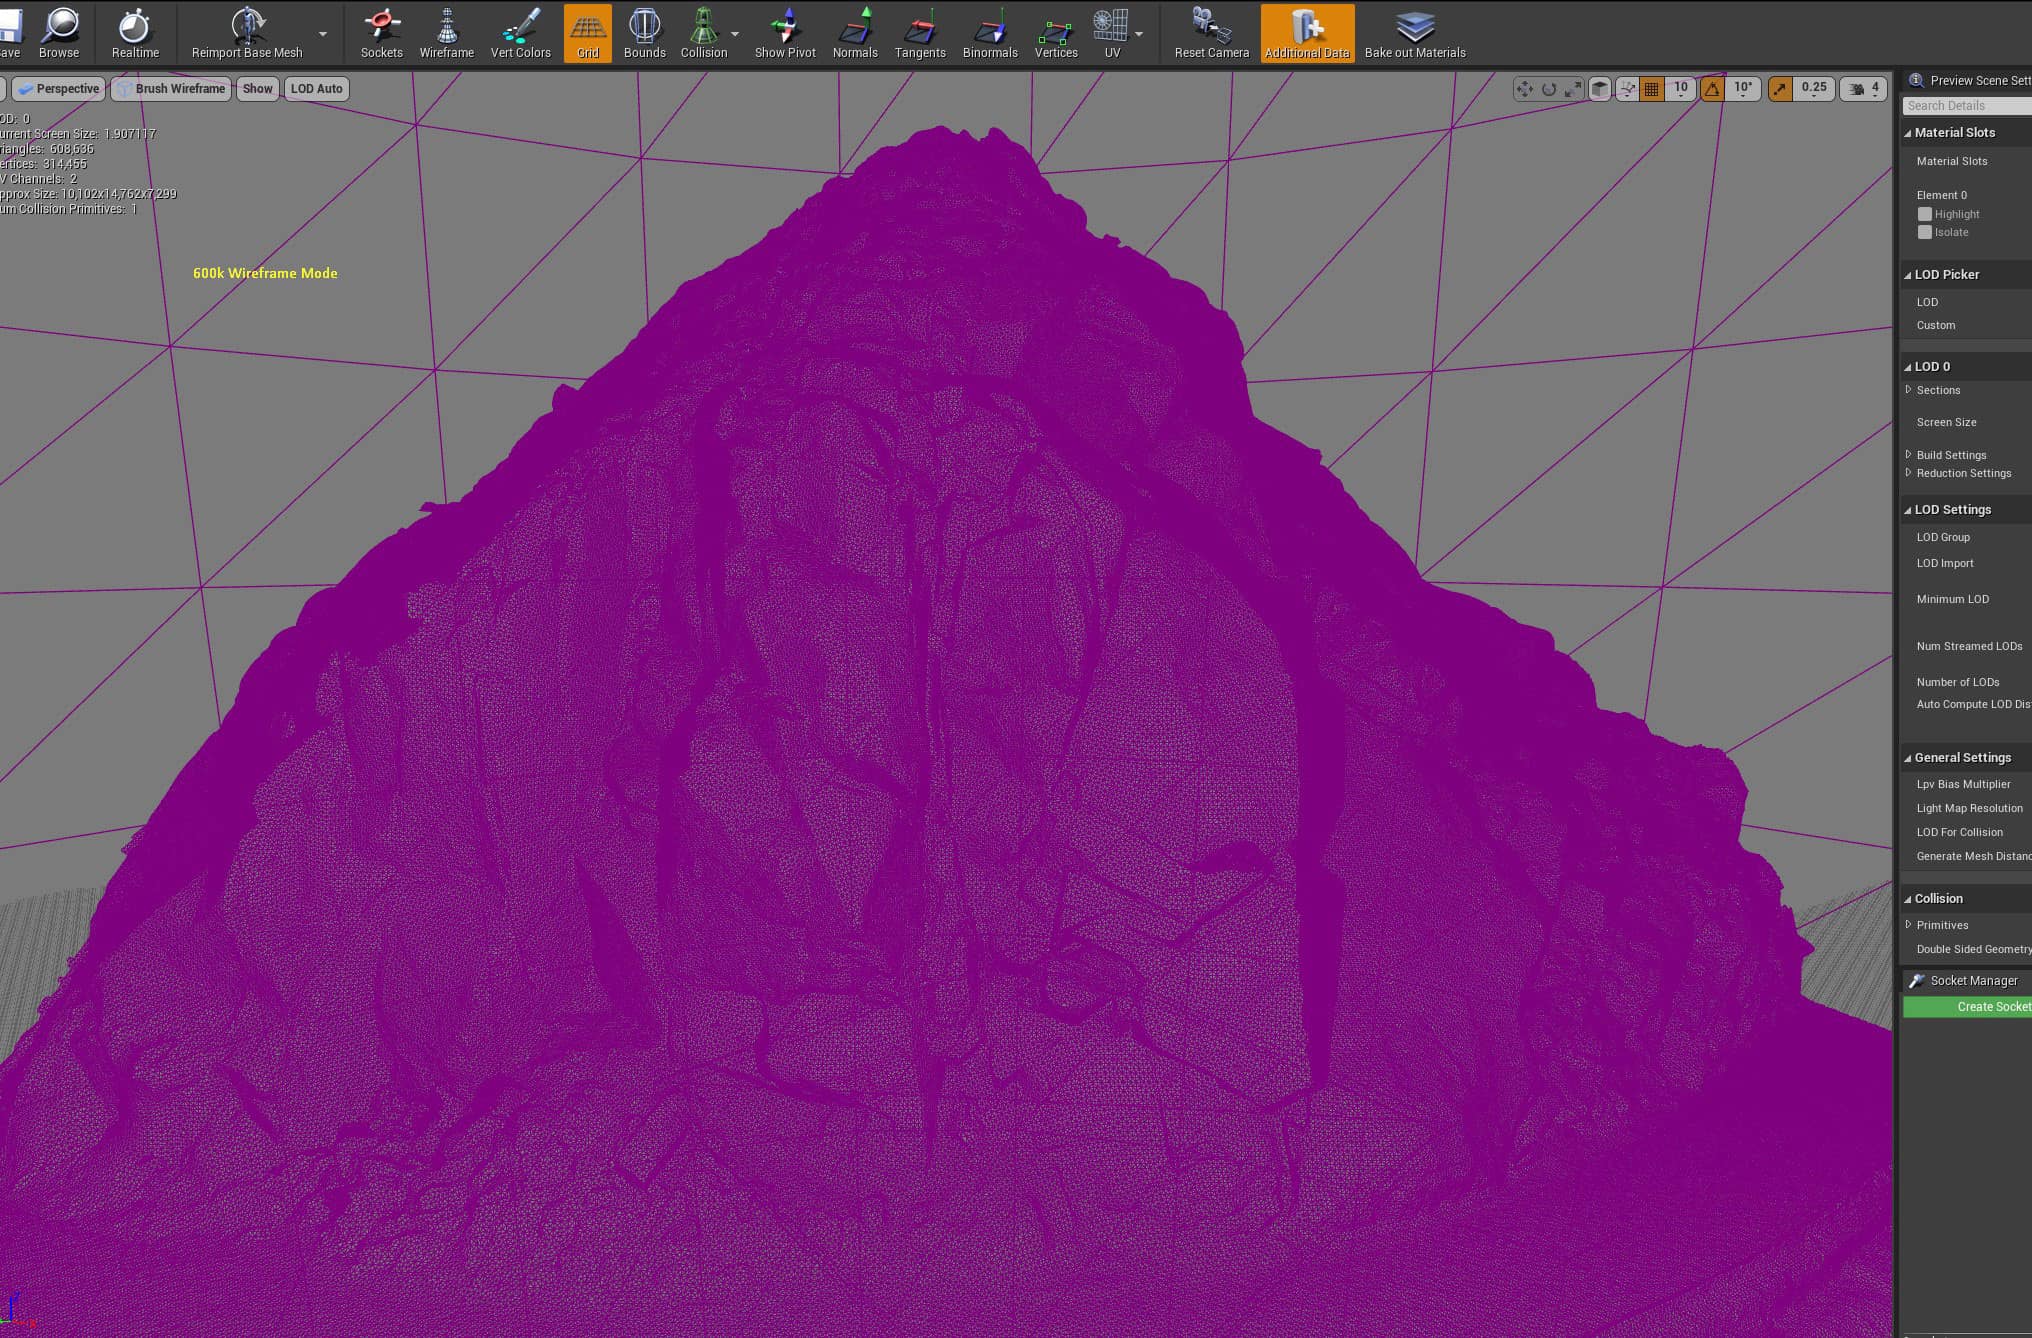
Wireframe 
With 16k texture map
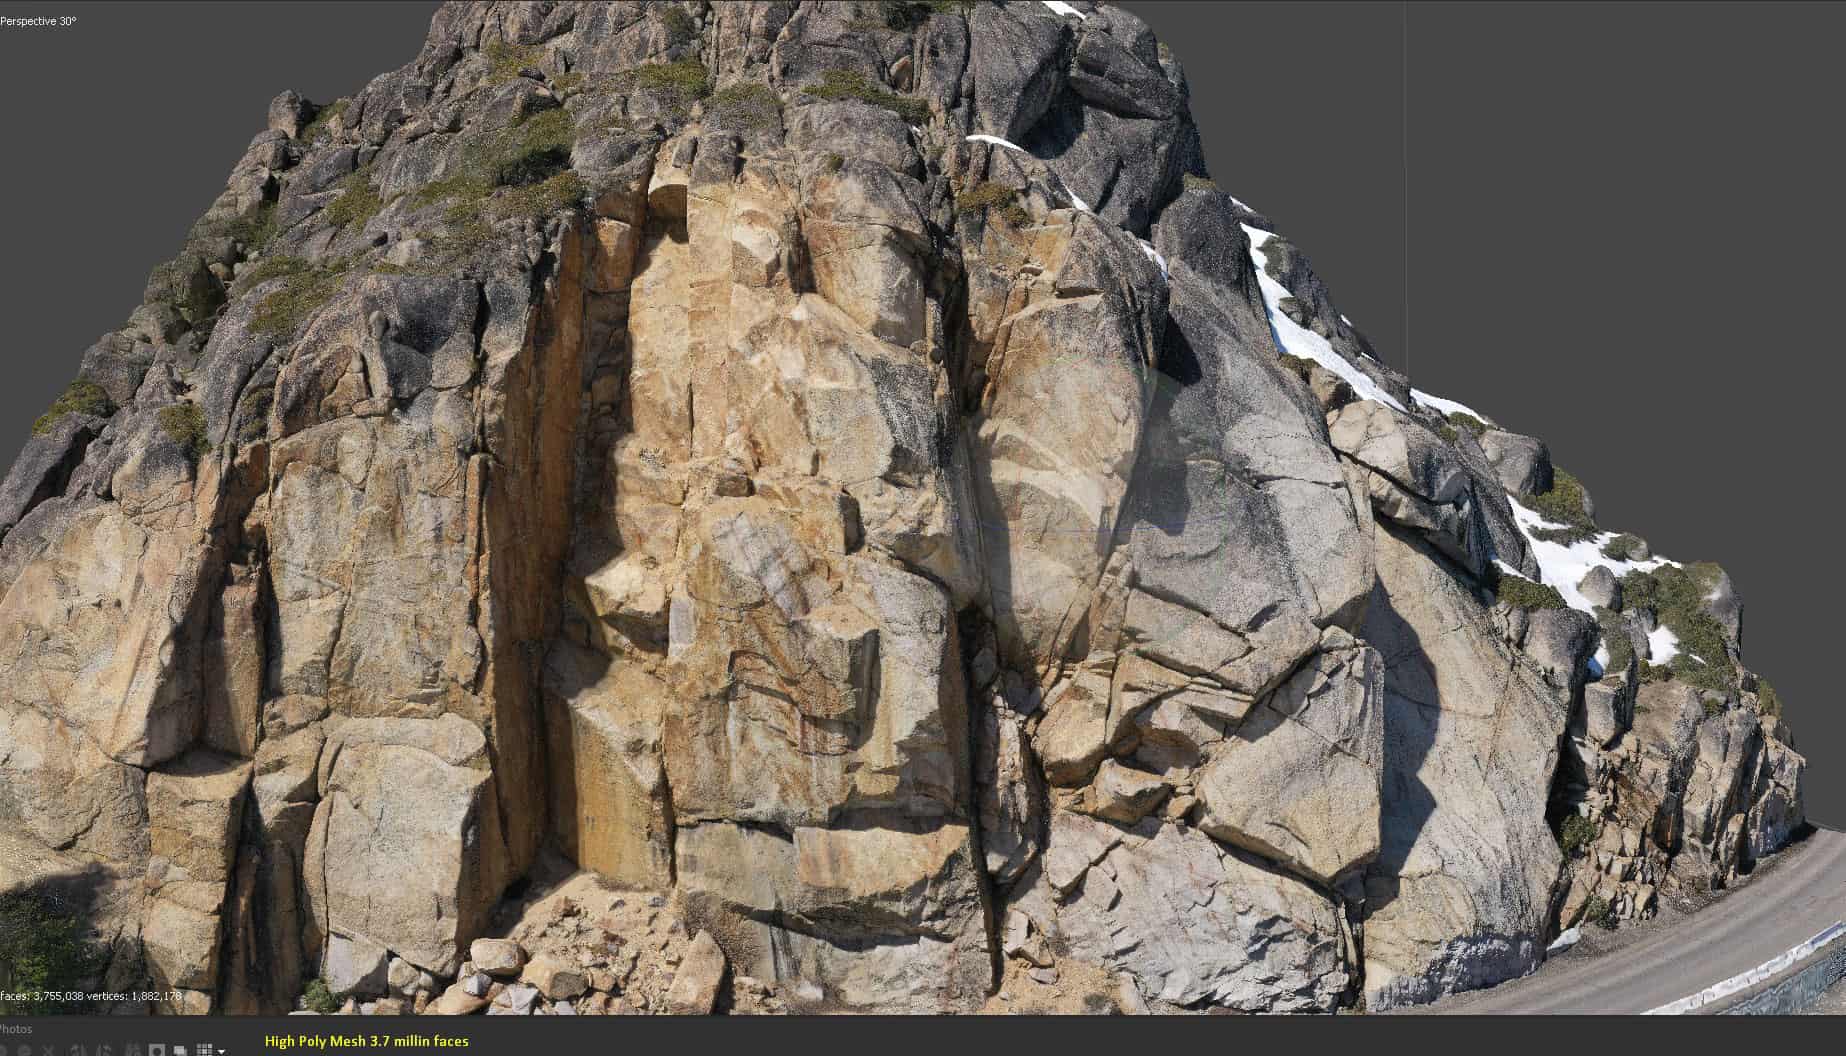
As you can see from above the results turned out better than I expected. Of course this is a very high resolution 3d model which no game engine yet can render this without blowing their poly budget (unreal engine 5 may change this).
That wraps up the basic flow of generating a mesh from photos. You can now export this model as an obj and load it into any 3d modeling package.
Optimization Process
One of the key things is the mesh optimization and retopo process where you generate a much lower poly version of your object with a good quad/tri layout and bake data from your high poly model down to your low poly model.
You can generate 2 other maps in Metashape which includes a normal map (for baking down to low poly) and ambient occlusion map (Ao).
To bake other maps such as roughness or anything you may need you can export both models into Blender and use its baking feature to do this. There are several YouTube videos that can help you get on the right path.
Metashape – You can use Metashape to decimate your mesh down to a set amount of faces and then bake the diffuse, normal and AO.
To do this, select your high poly mesh and select duplicate. This will create a copy of your high poly mesh. Then select your new mesh in the outliner and set as default (very important). This will select the copy and any changes you make will be done to the copy and not the original mesh.
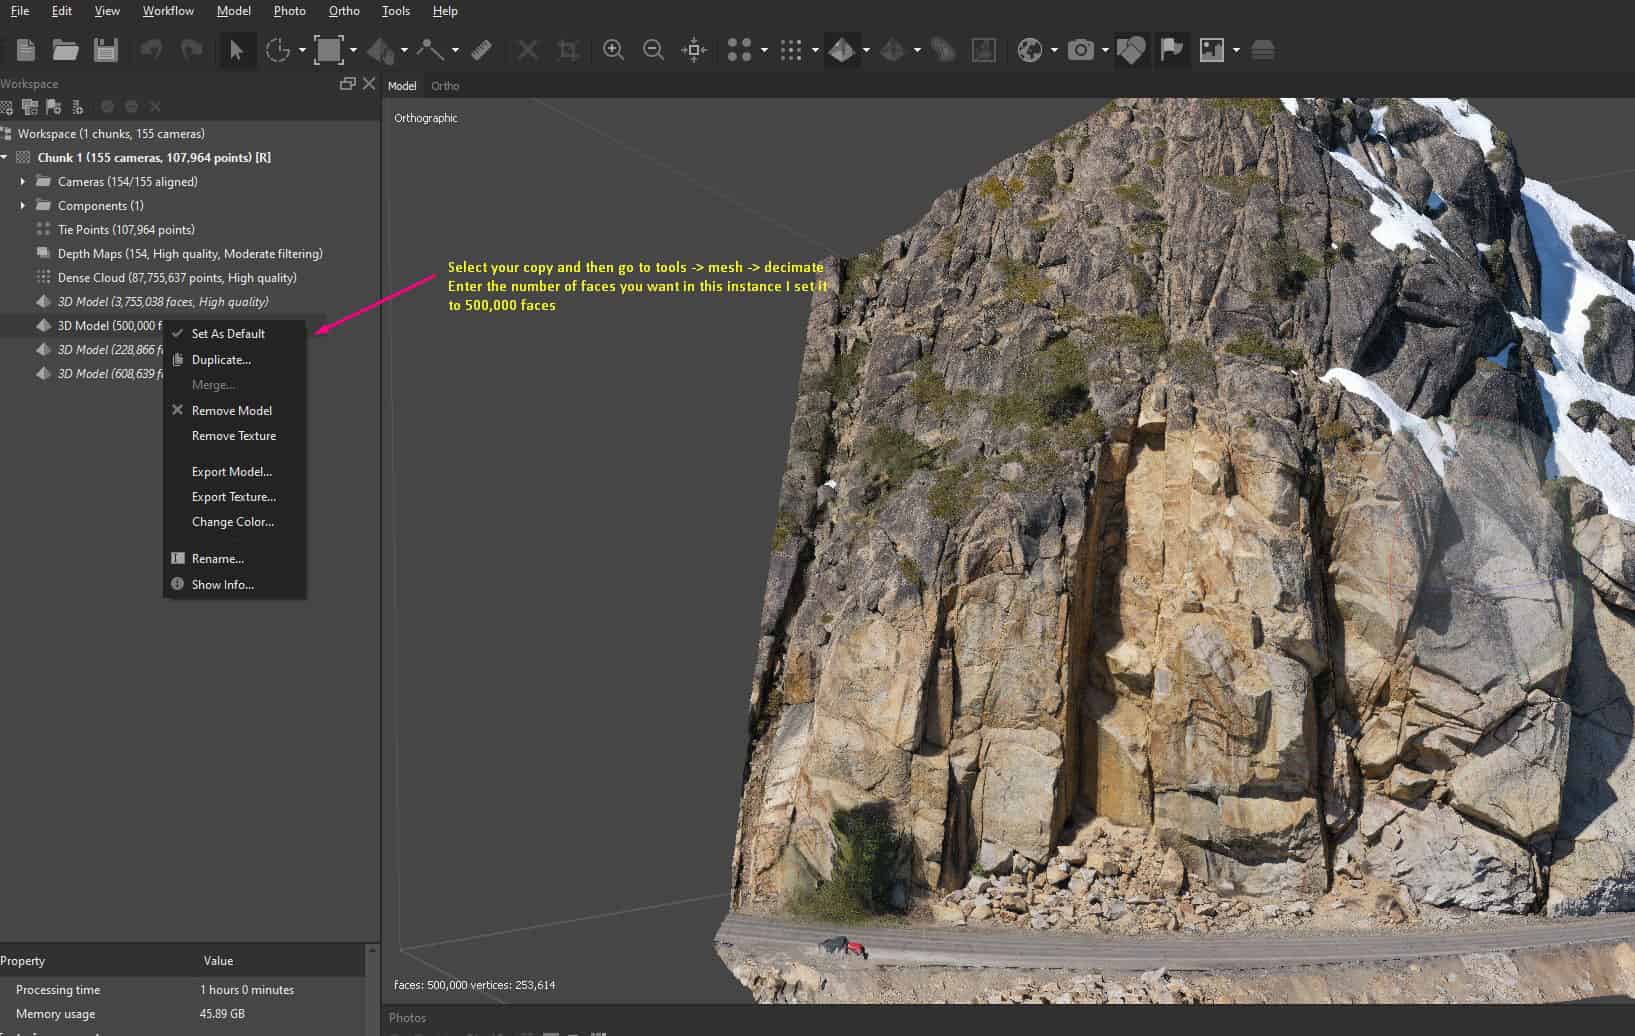
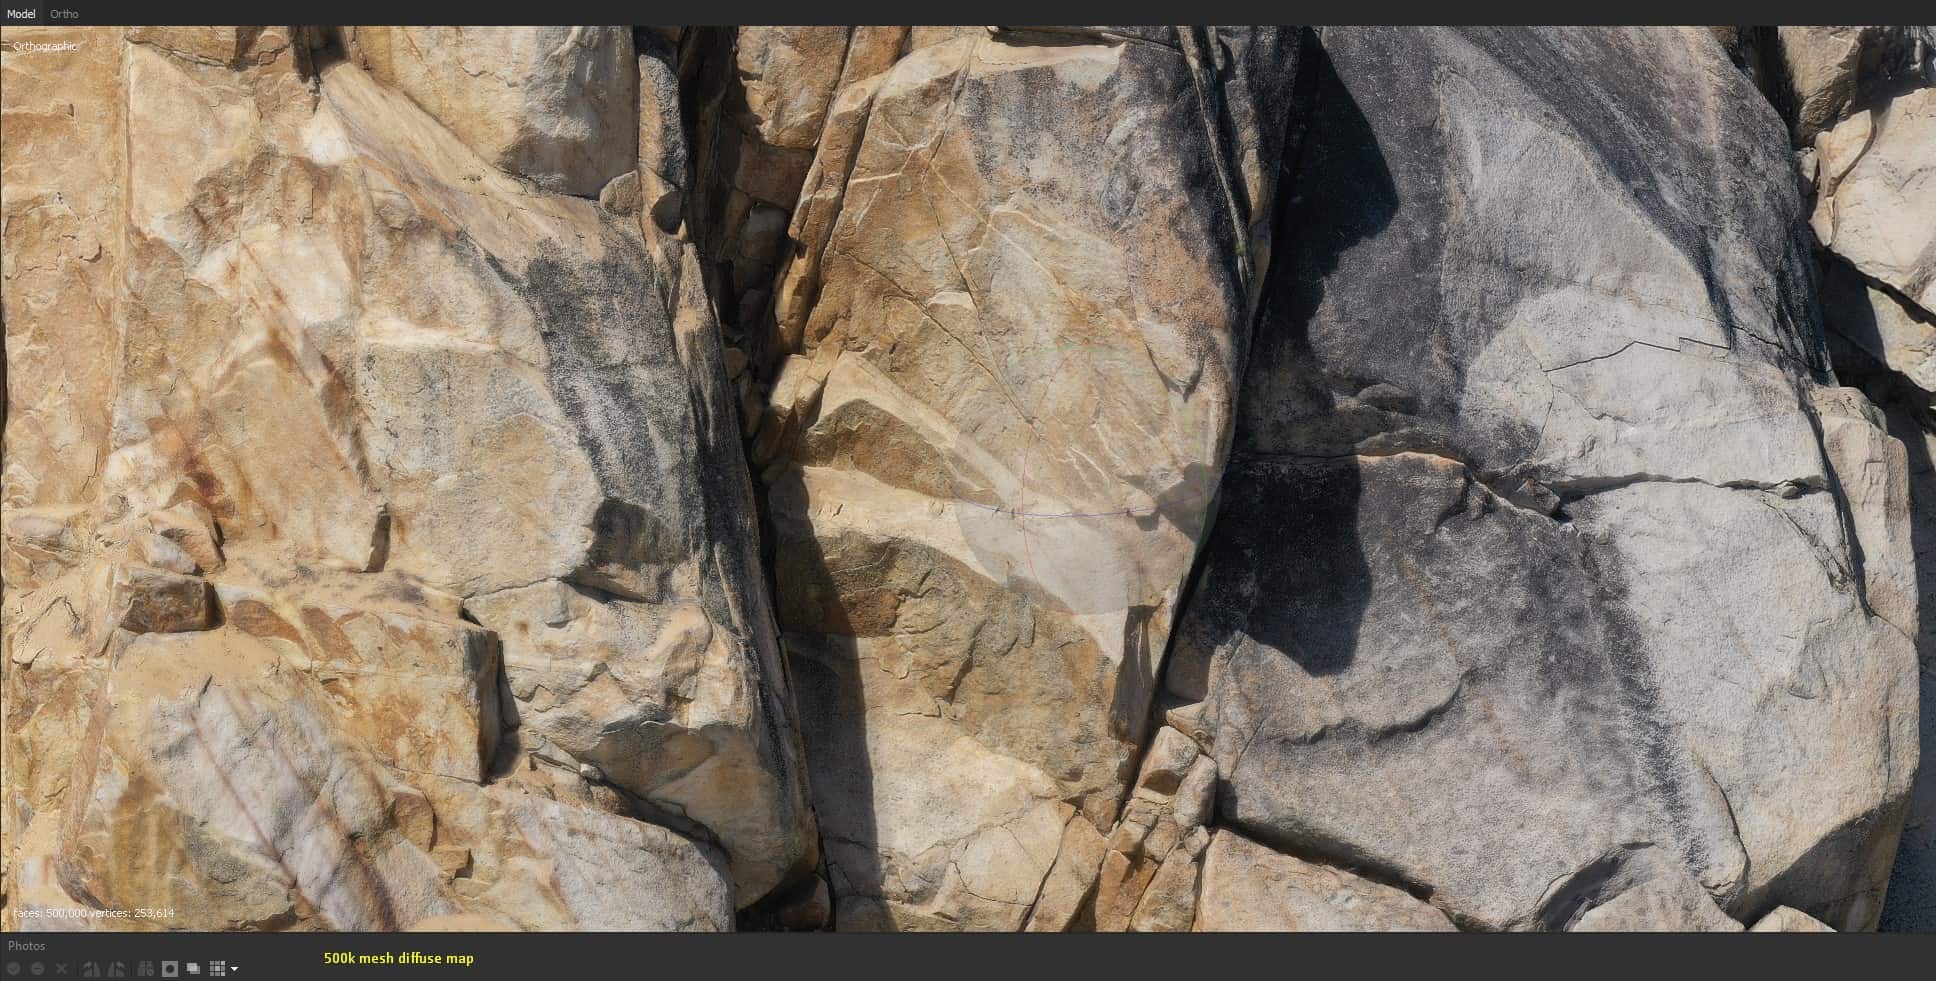
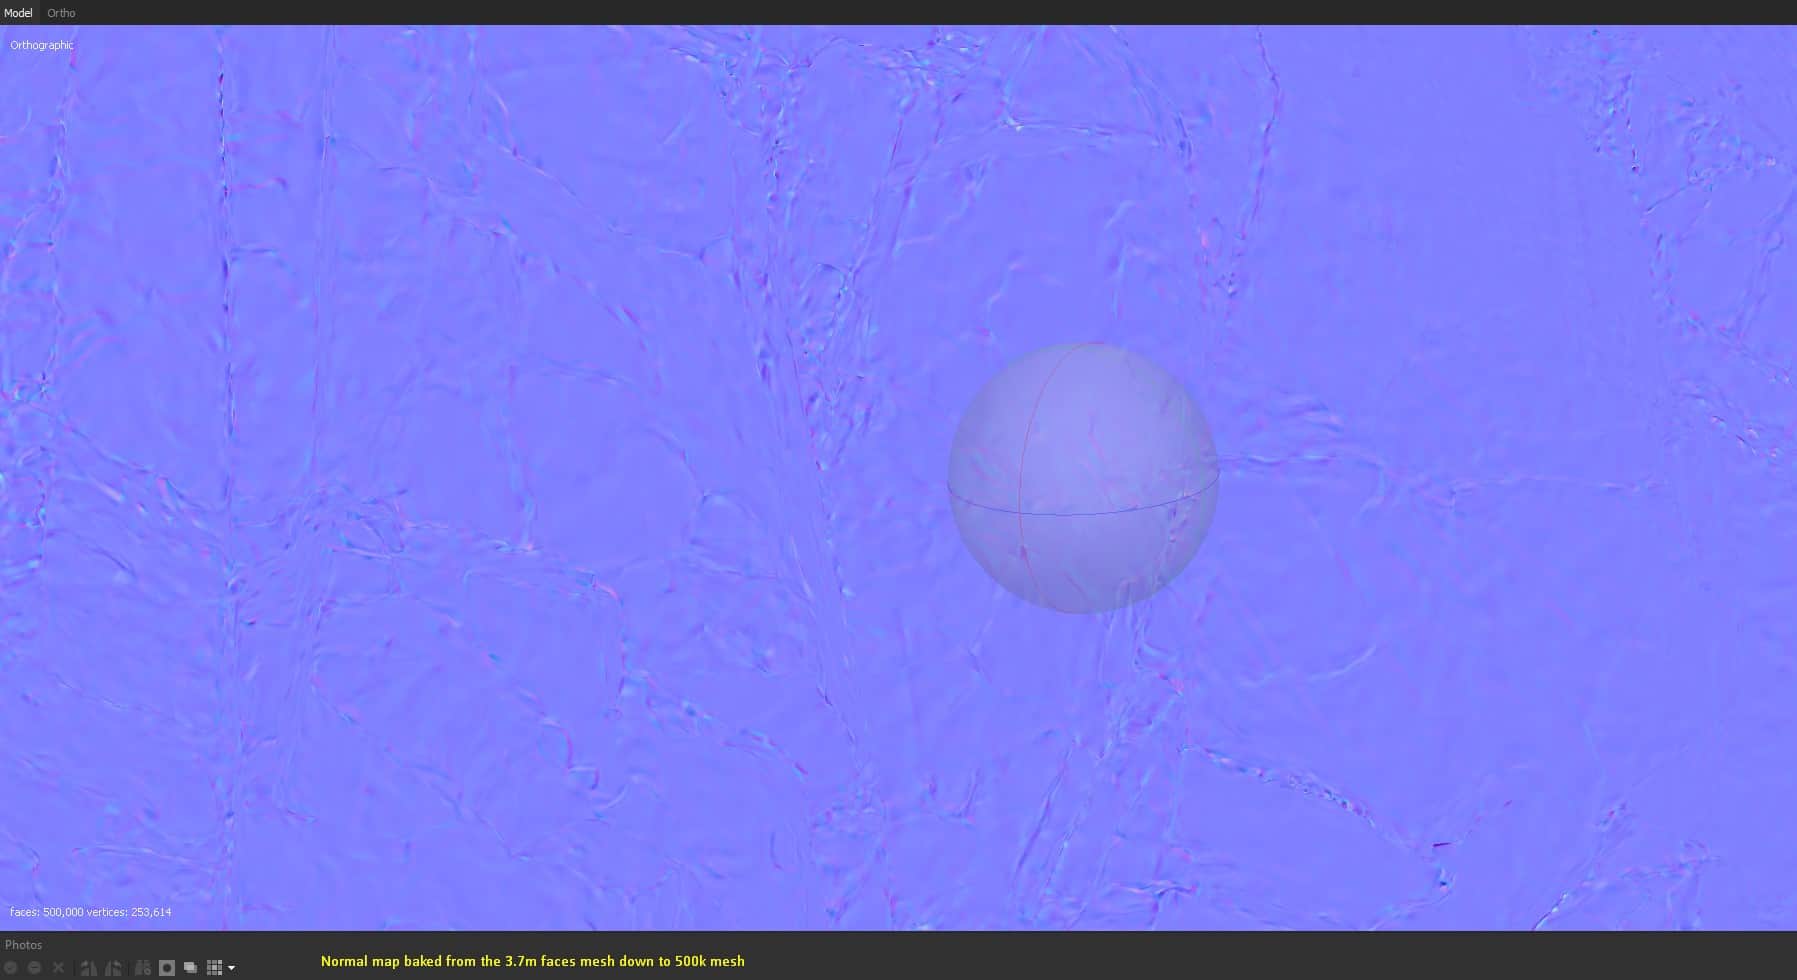
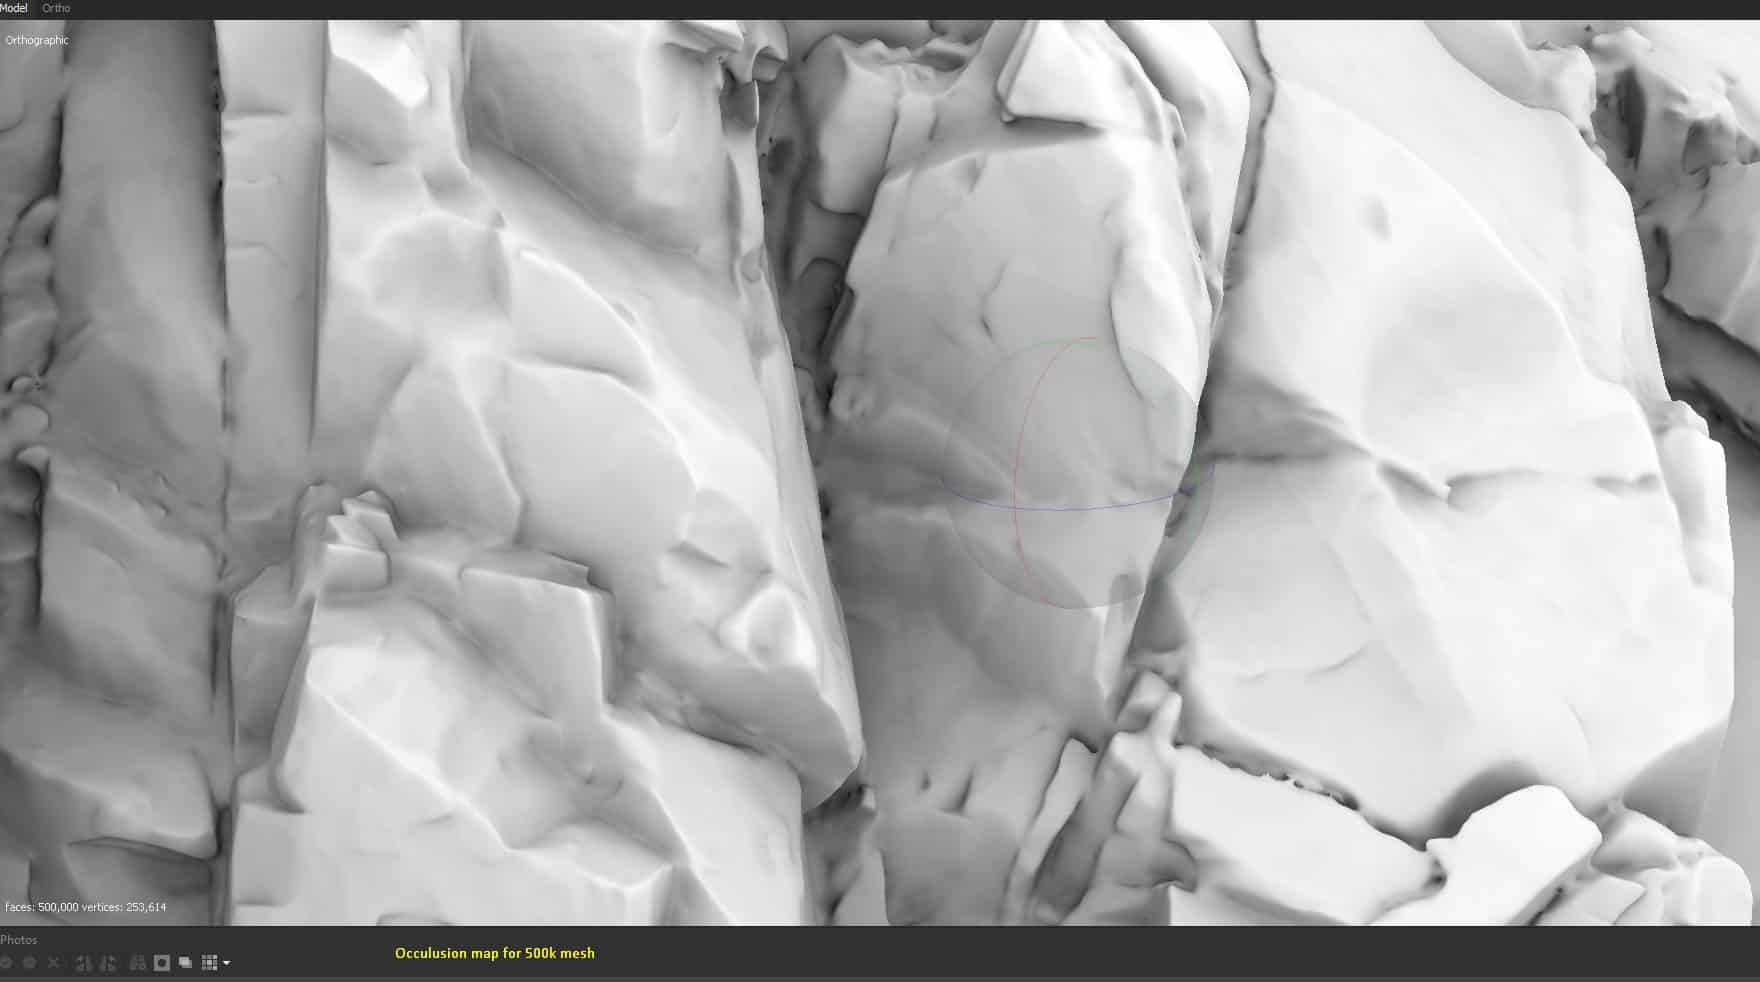
Once you have decimated your mesh you can rename it to something like Decimated 500k. Now you can bake your maps from your high poly 3.7 million faces mesh down to your 500k mesh. Follow the steps below.
- Make sure to have your low poly mesh set as default.
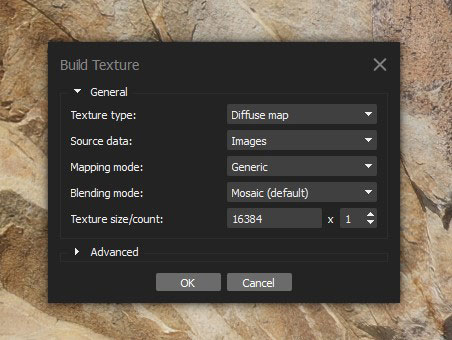
- Workflow -> Build Texture -> Texture Type Diffuse (source data images, rest can be default, and then choose the image size)
- Workflow -> Build Texture -> Texture type Normal (key thing for this is to select in your source data your high poly mesh)
- Workflow -> Build Texture -> Texture type Occlusion (key thing for this is to select in your source data your high poly mesh)
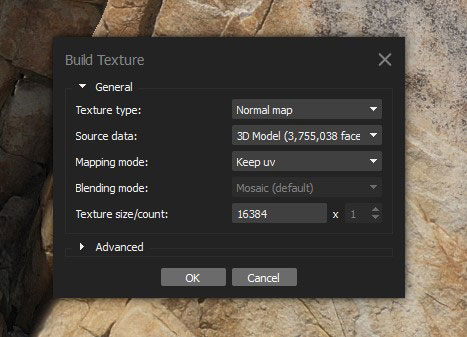
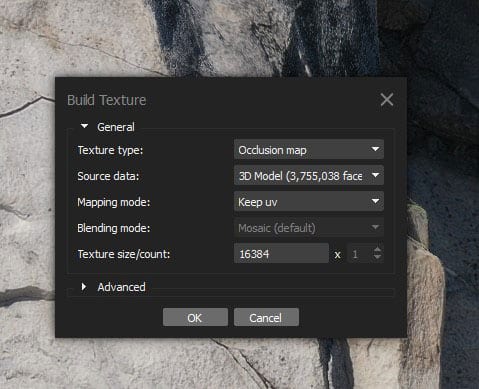
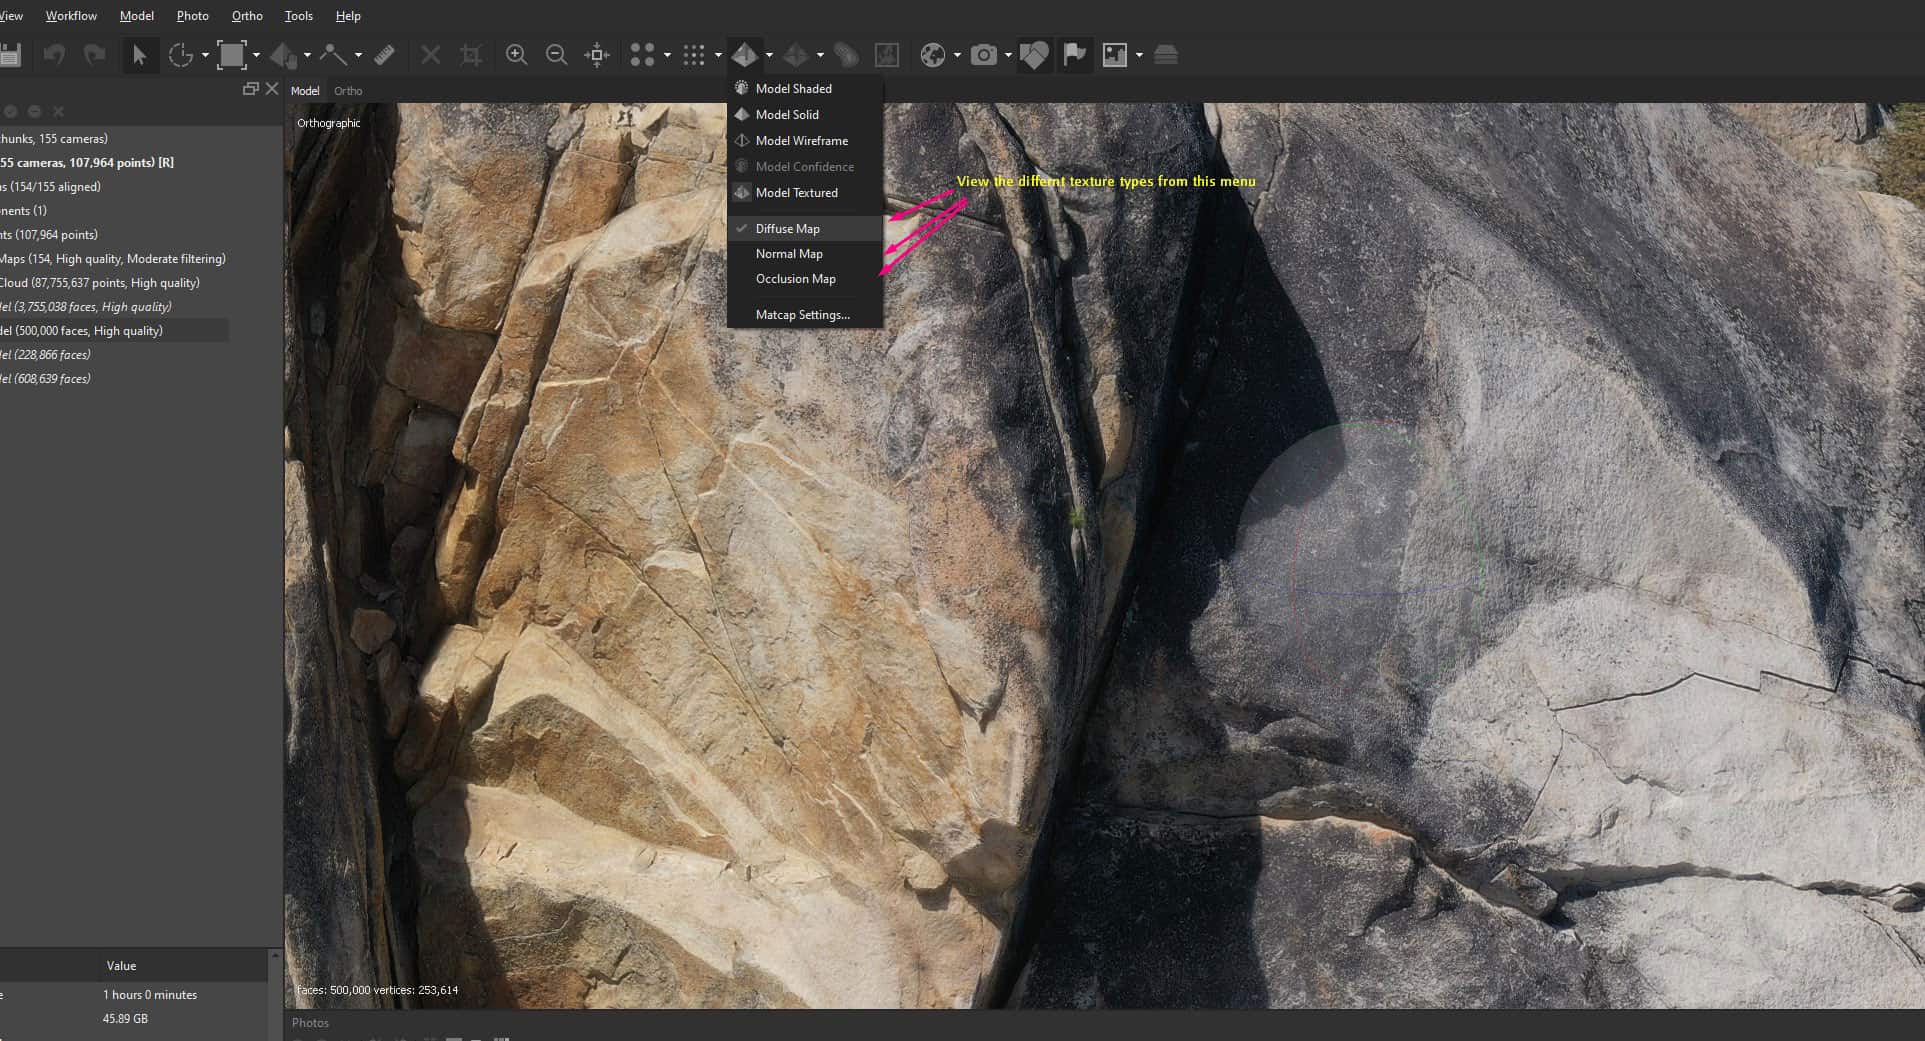
You can now view the result of your model by switching the texture types.
Below are the texture, normal map and occlusion map results for the new object. I have to say from a drone the texture quality doesn’t look too bad.
So that’s the basic way to bake your maps from a high poly to low poly in Metashape.
Mesh Cleanup
One trick I do to get better topology of the object is export out my high poly mesh then load it into this free application called Instant Meshes.
See screenshots below on how I clean up my model with this app, then import that cleaned up model into Metashape again and then bake down to that version of the cleaned up mesh.
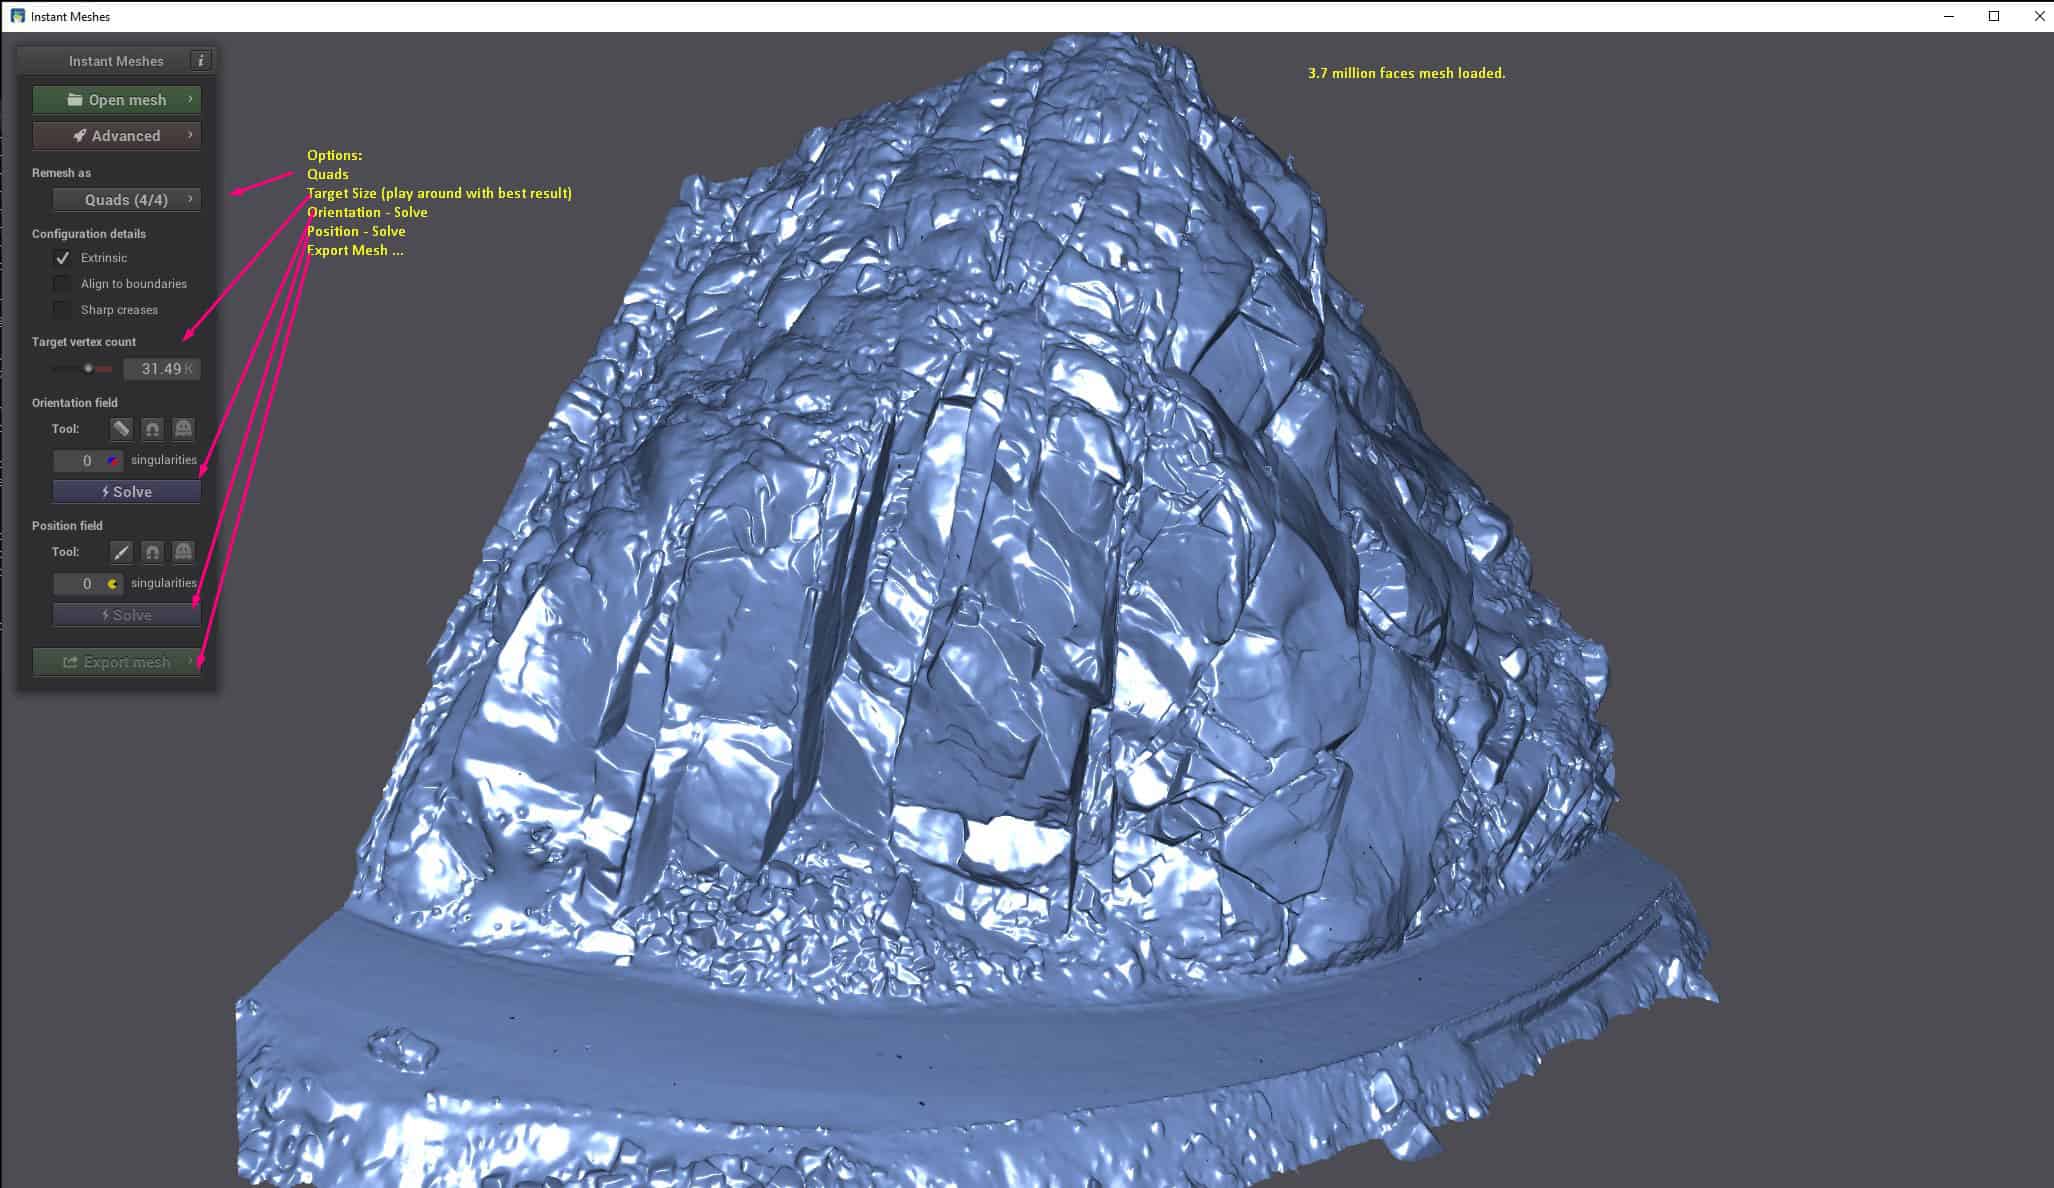
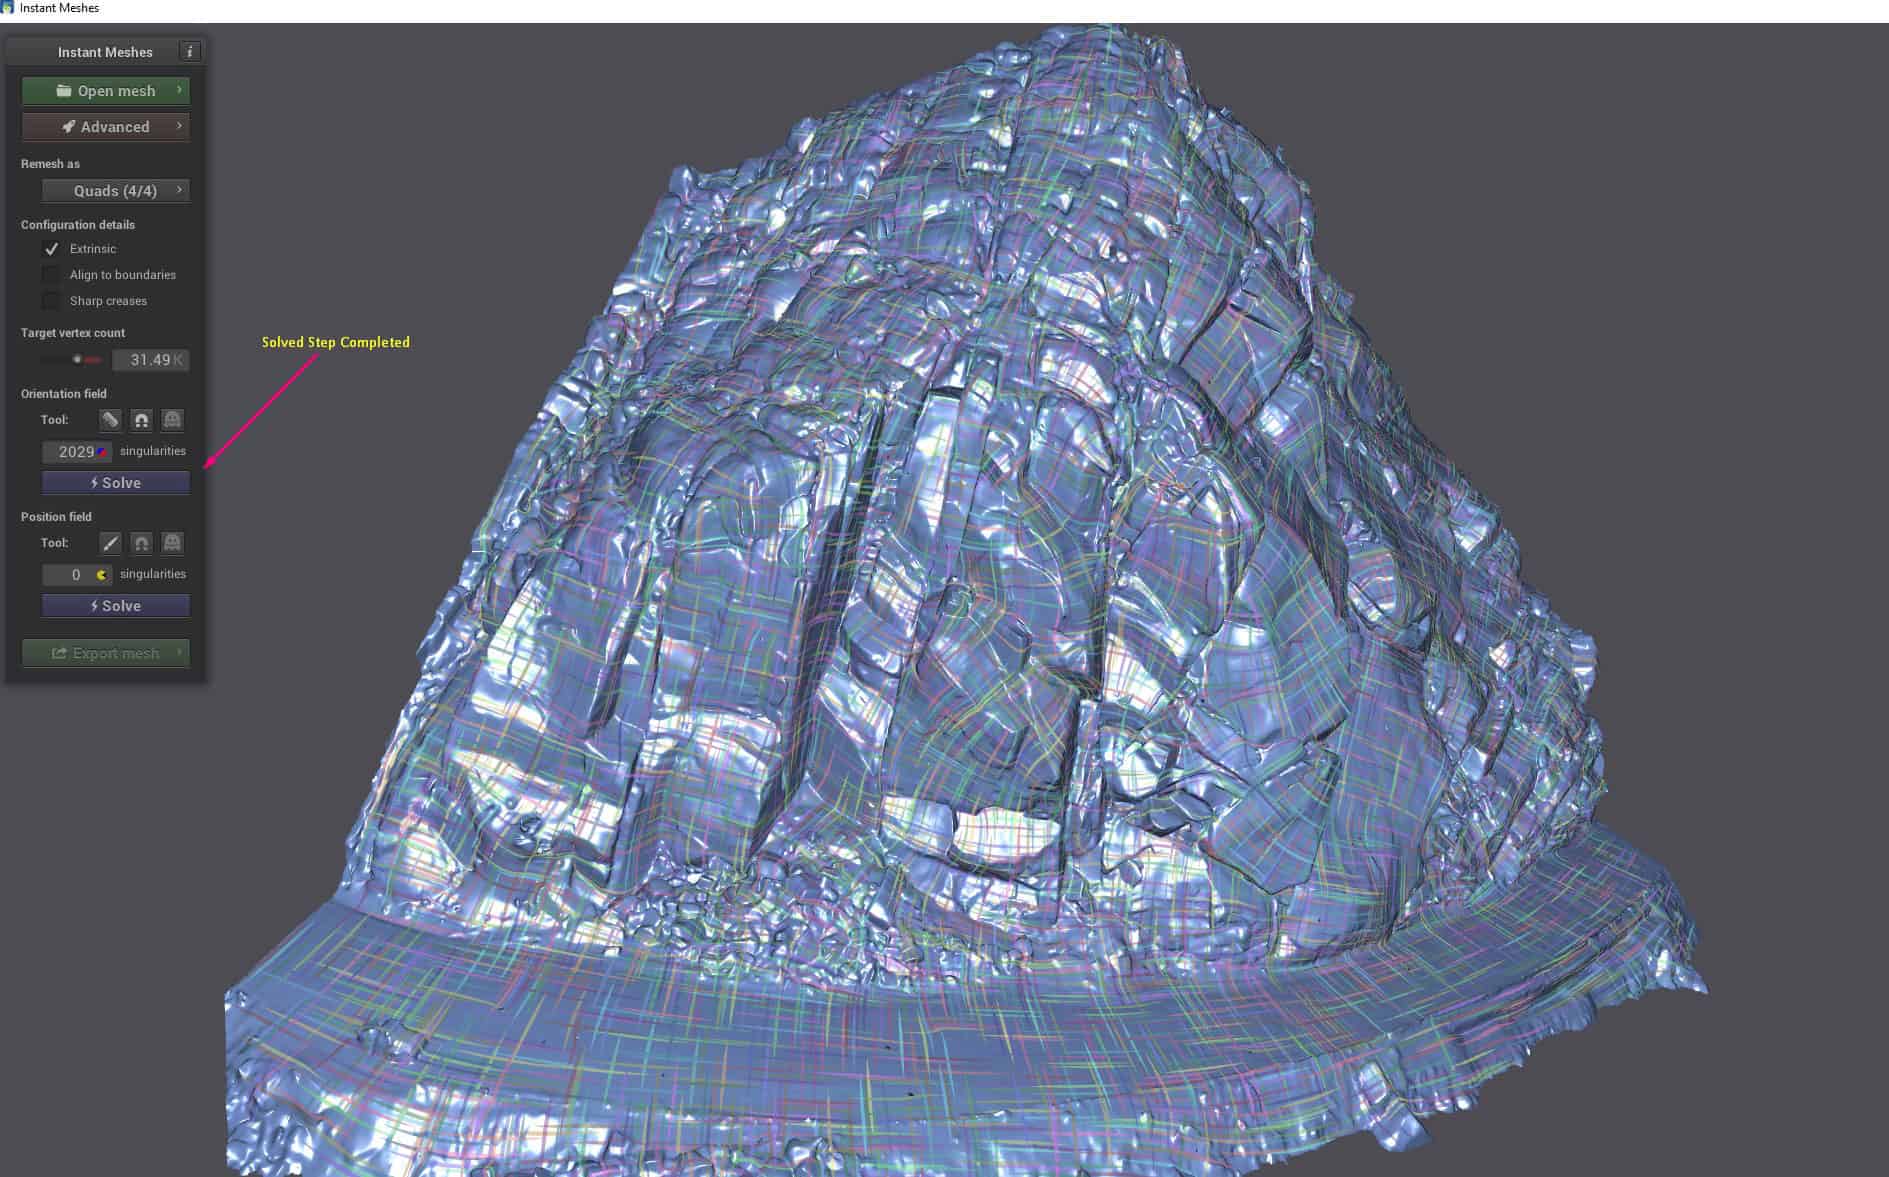
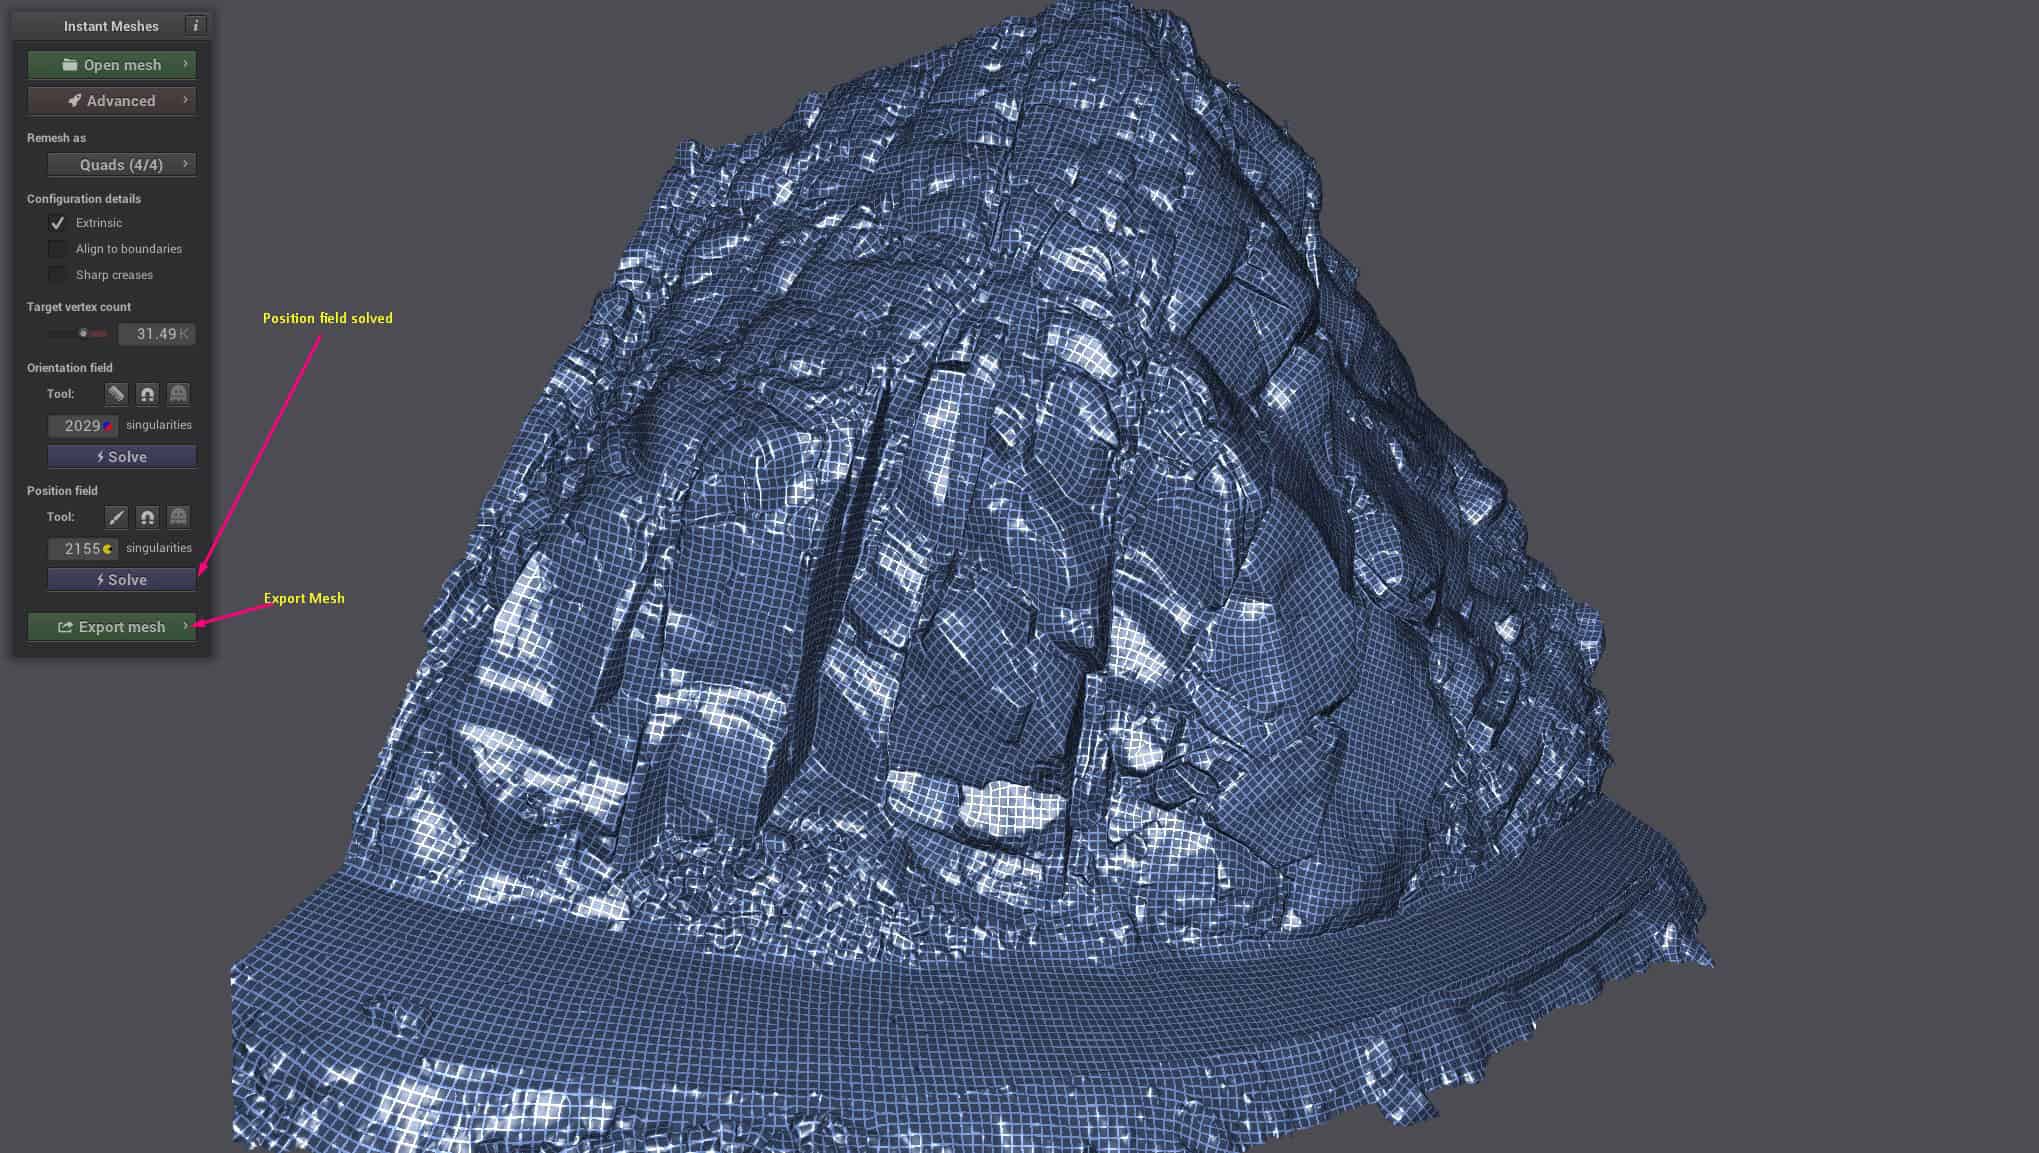
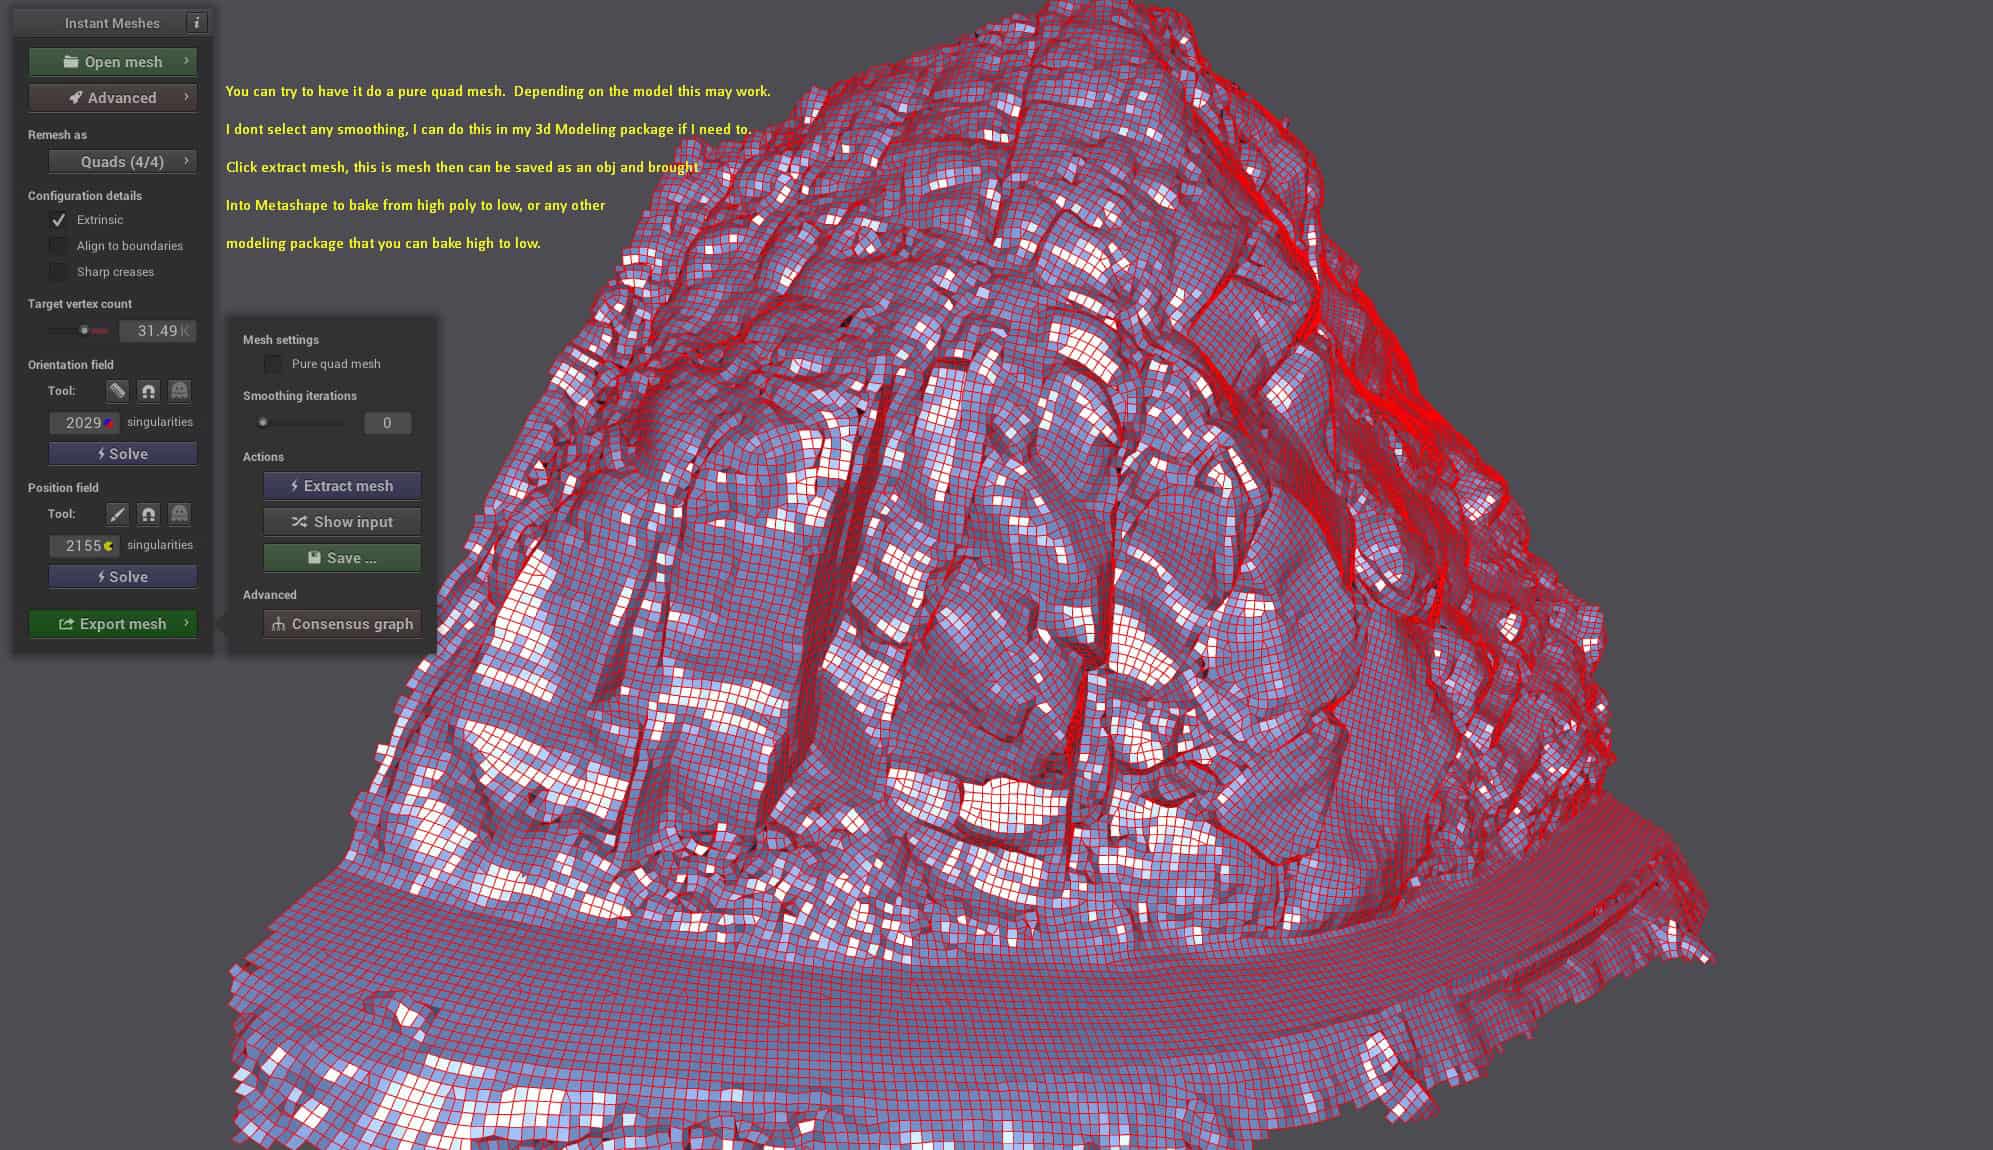
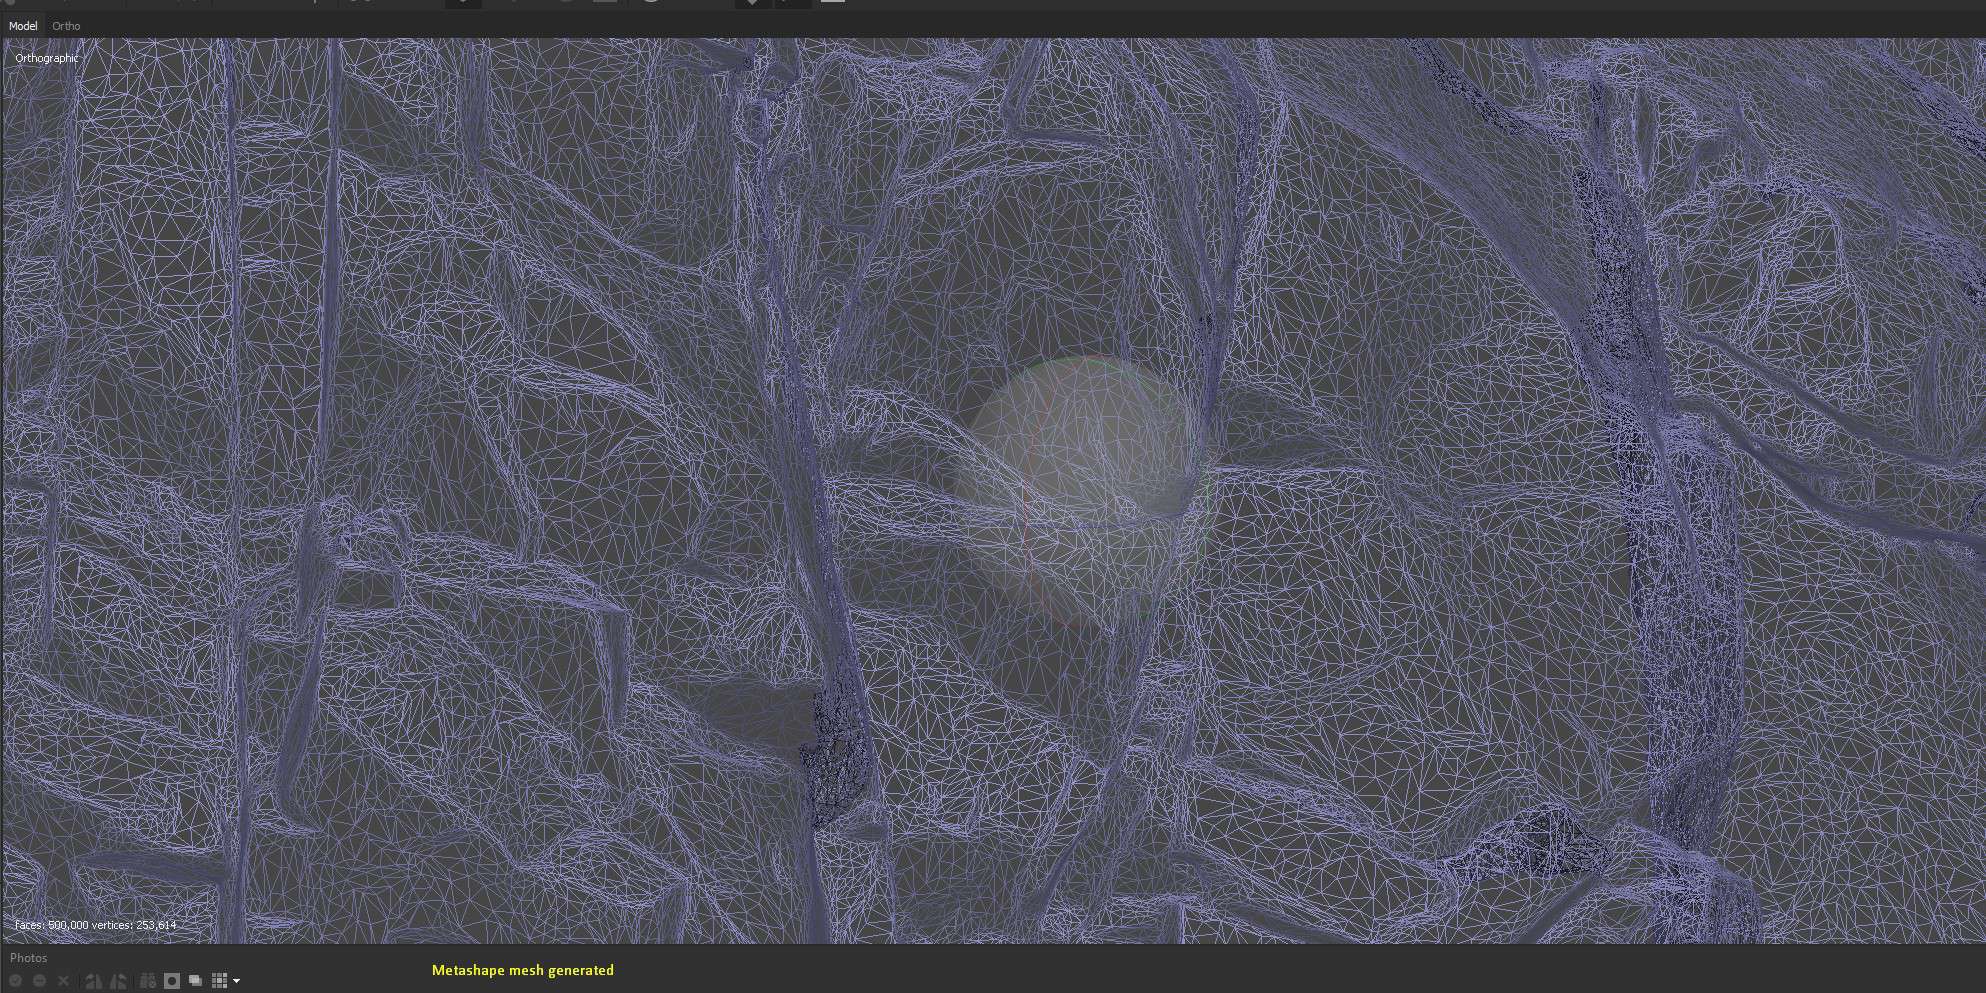
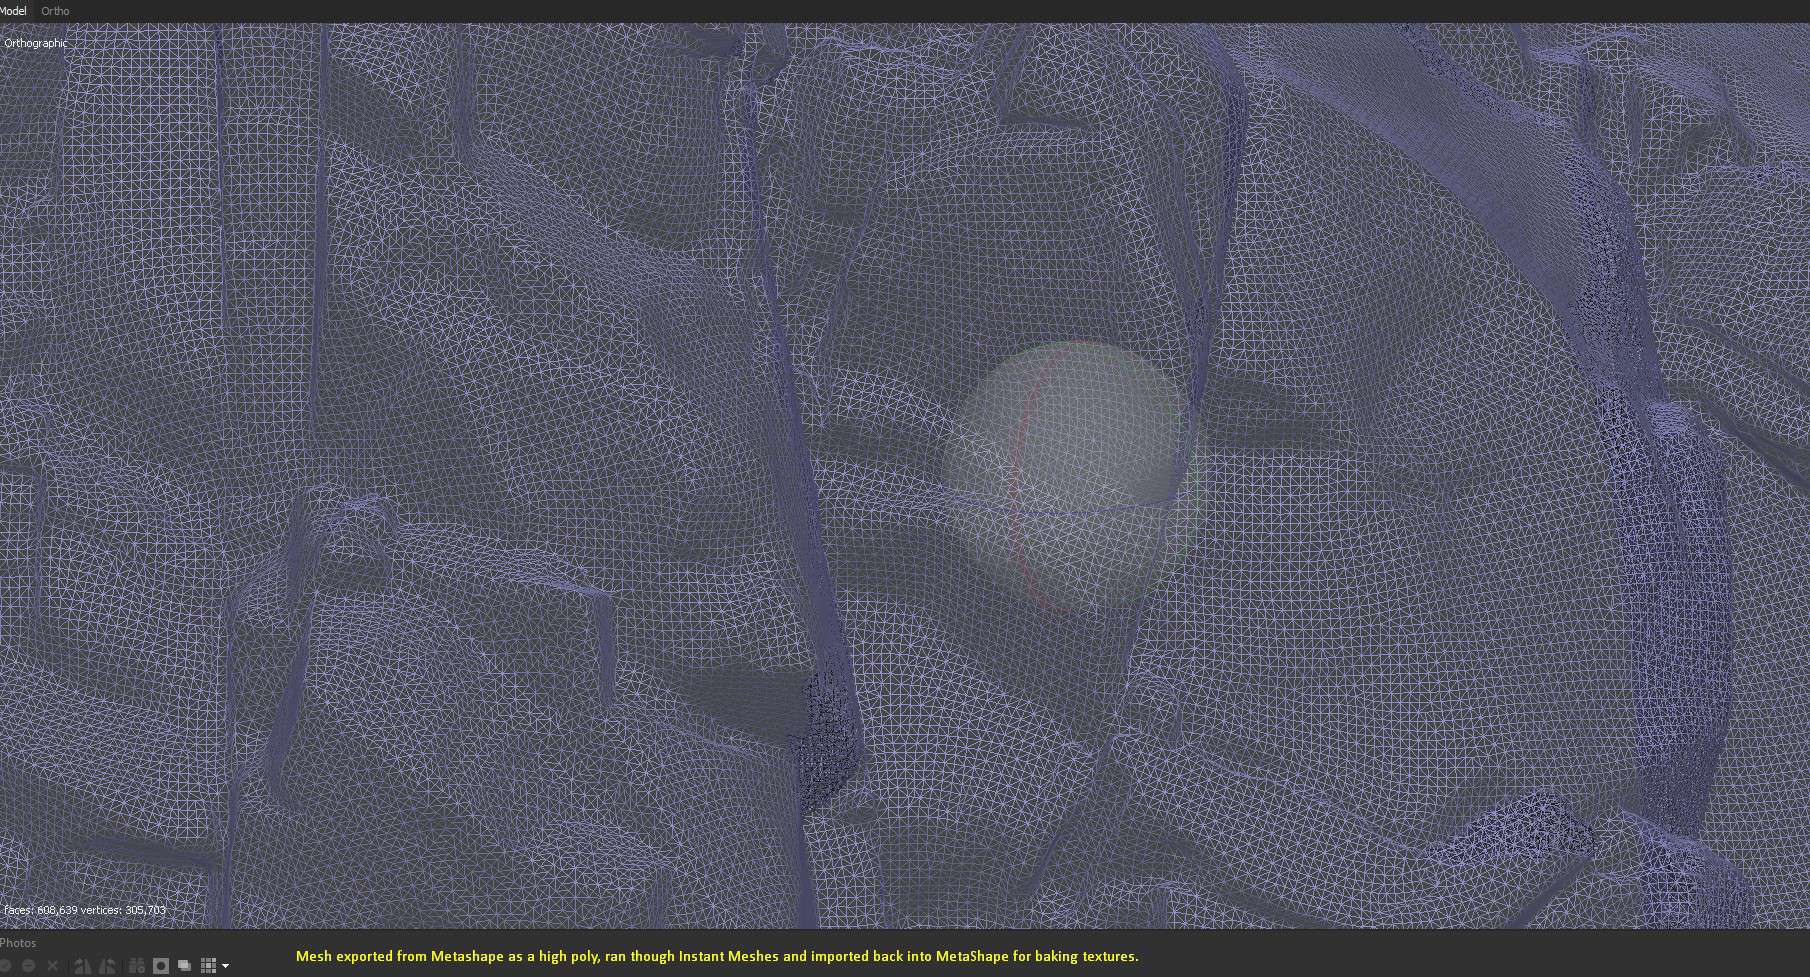
It’s pretty simple and again with everything you will need to play around with how much reduction you want before the model starts to fall apart and not look good. These two next shots show the Metashape generated mesh and the same mesh ran though Instant Meshes.
Of course as stated above you can also do this in your favorite 3d package. I use Blender for most of my 3d modeling and below are some screenshots of the object loaded into blender.
Blender
You can do a lot of the mesh clean up in Blender and bake out your specific maps as well, I won’t go into details on this because there are numerous videos on YouTube.
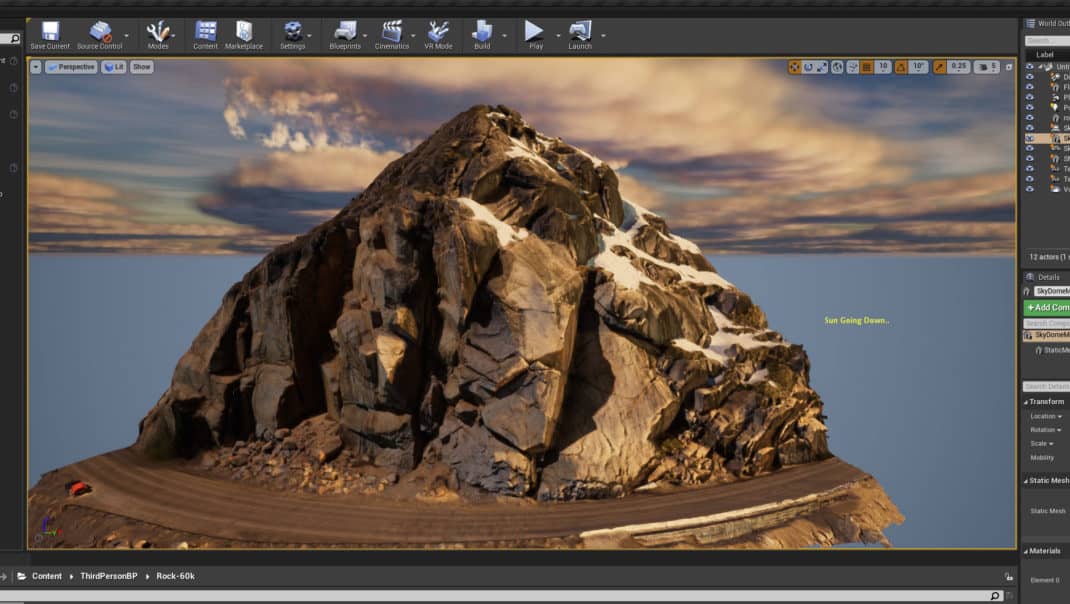
I do usually fix anything I see in Blender, properly position and align the mesh on the 0,0,0 grid and export out as an FBX which I load into Unreal Engine.
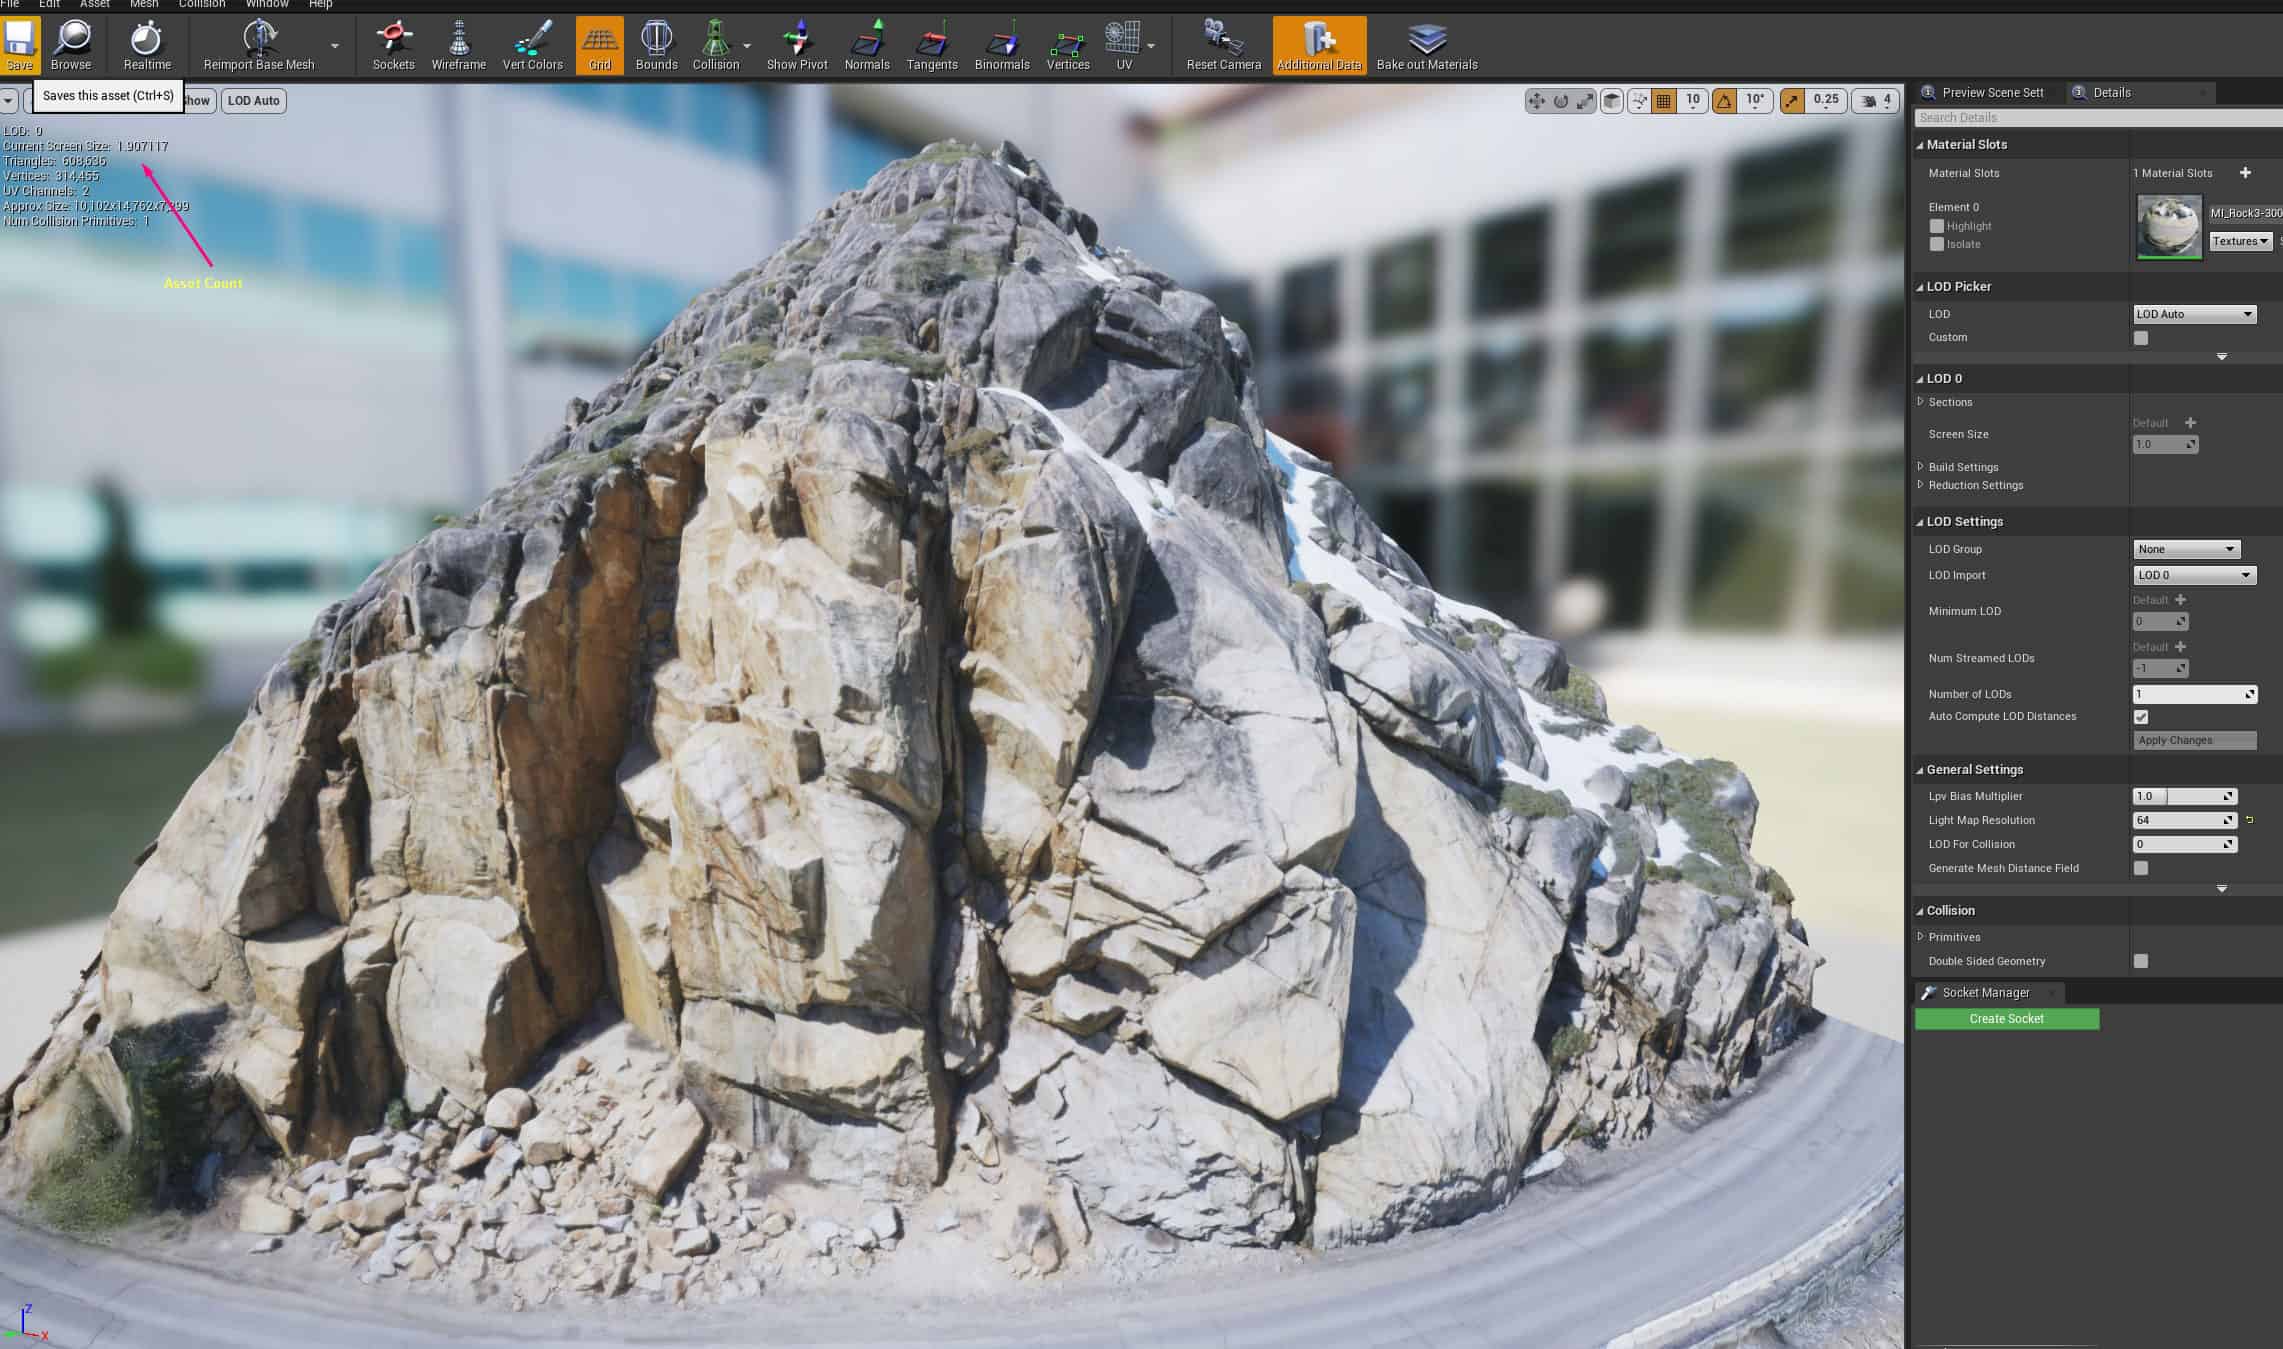
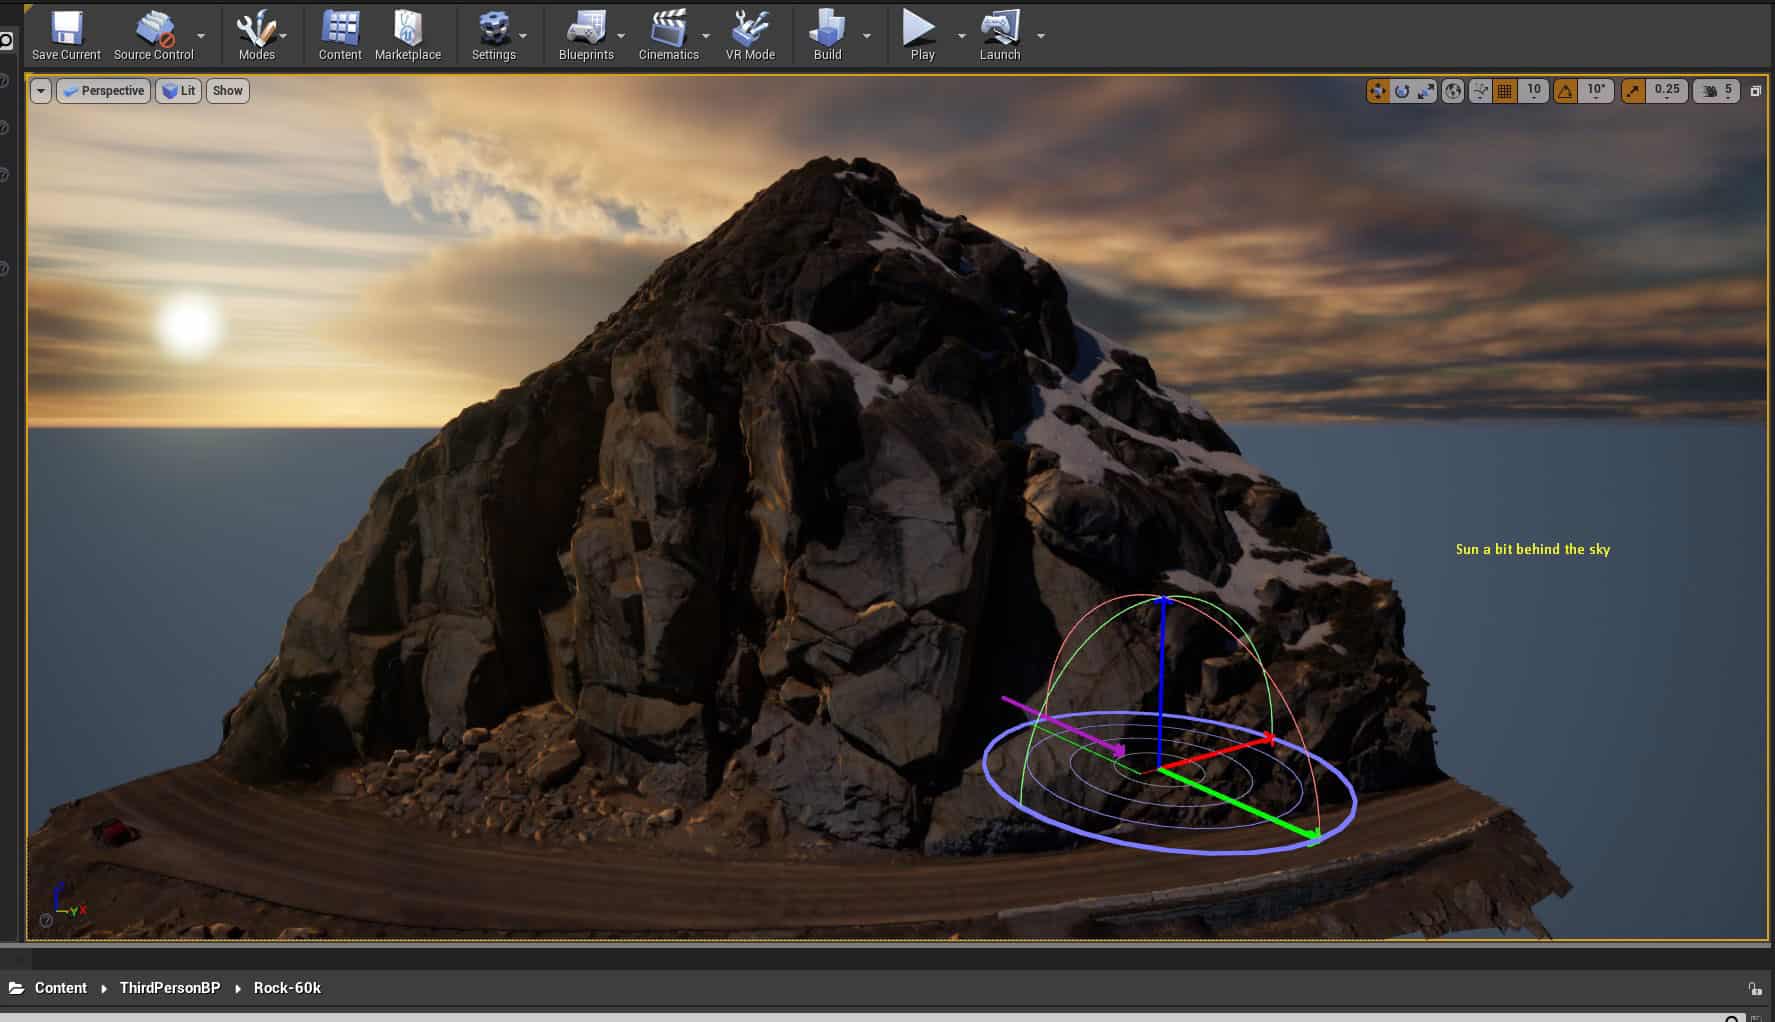
Unreal Engine 4
I won’t go into many details on how to get your model in but here are some screenshots of the mesh that was generated in Metashape, Optimized with Instant Meshes, Baked in Metashape against the high poly then brought into Blender to align the meshes position and finally exported out of Blender as an FBX.

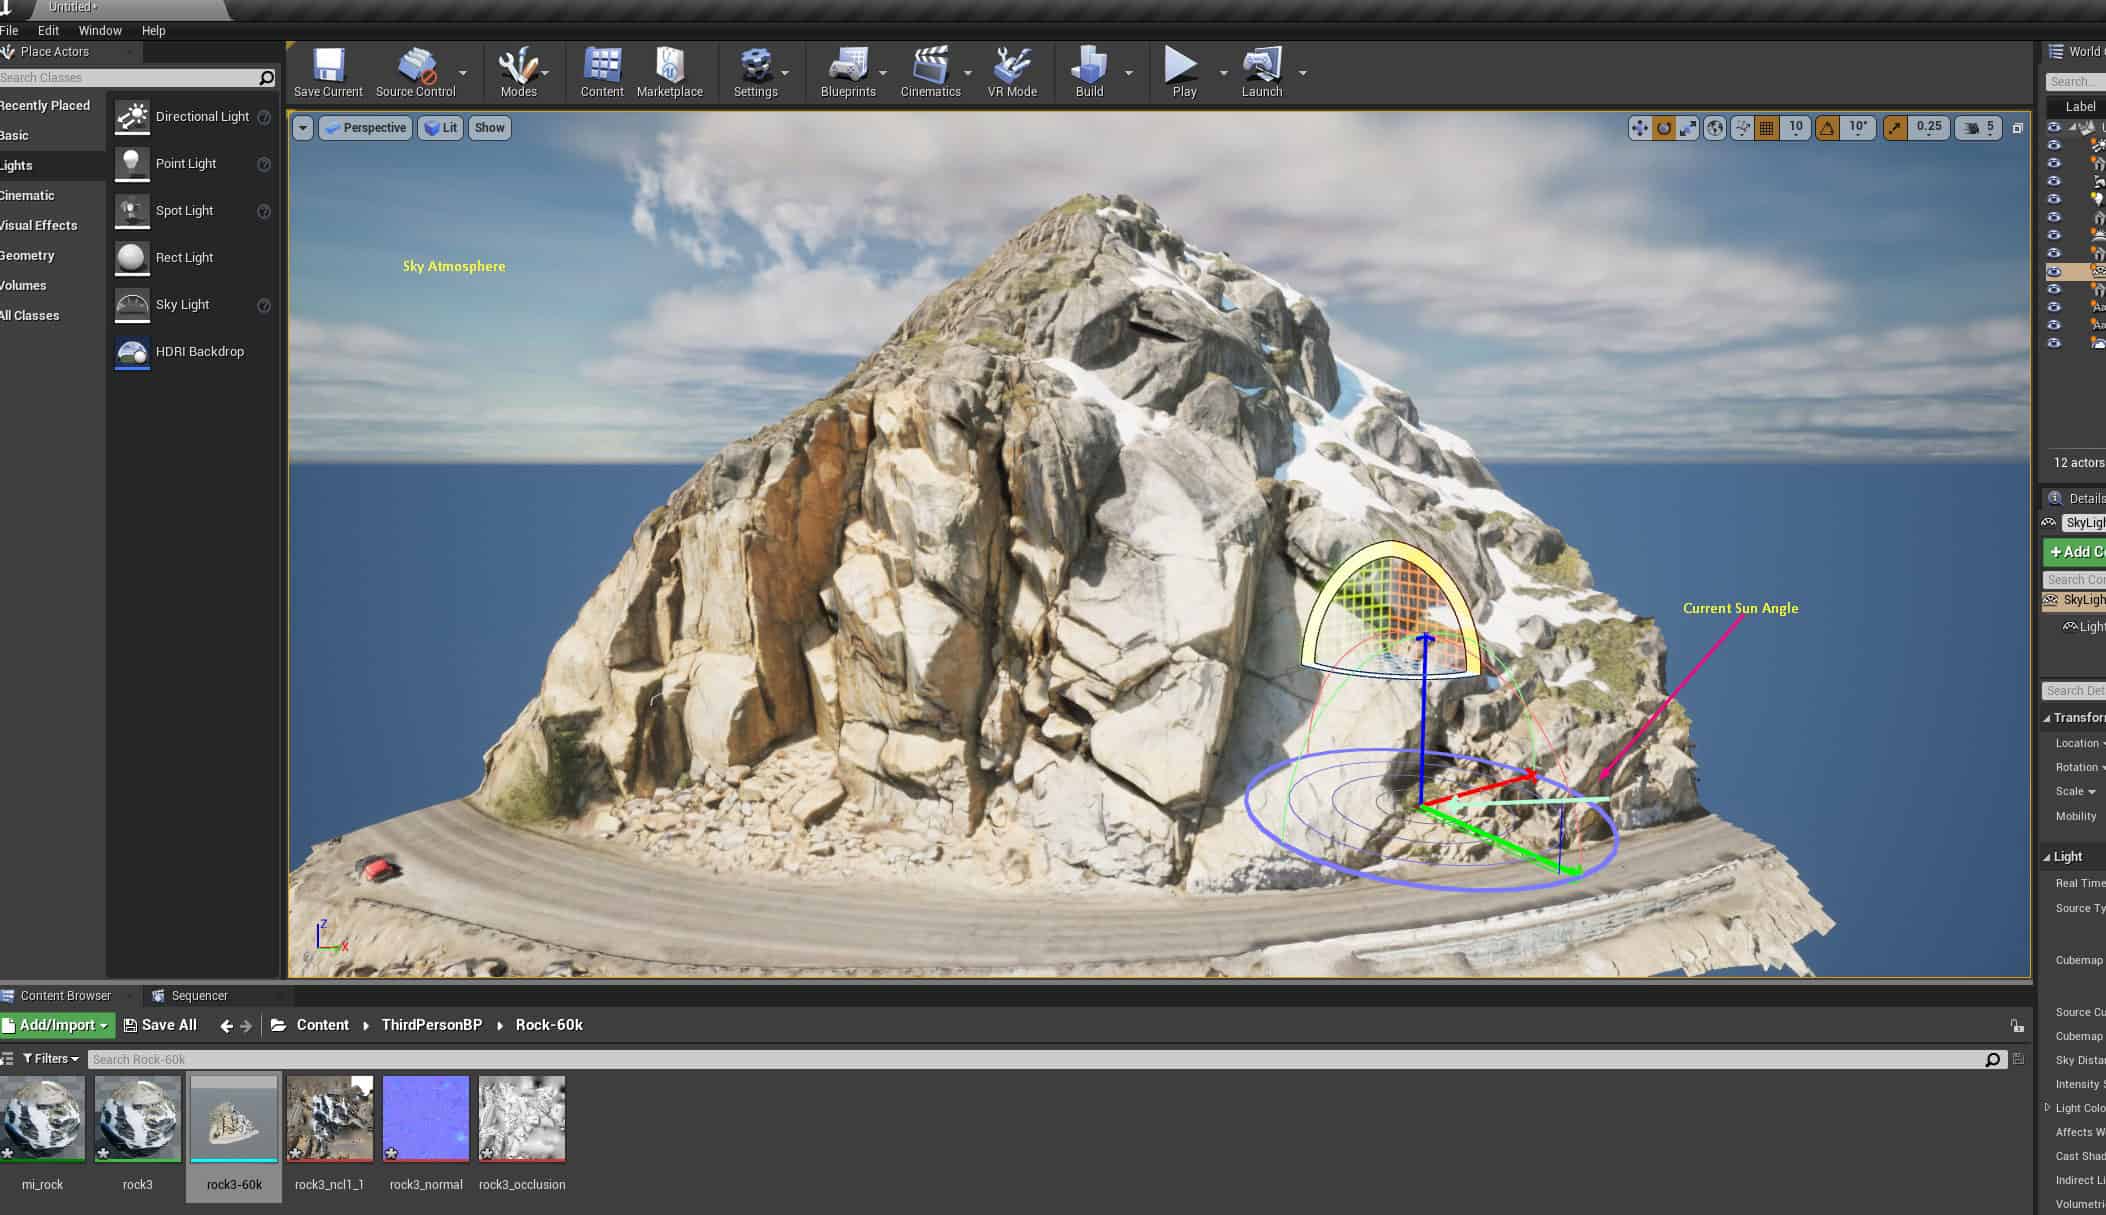
Here are some other shots using Unreal 4 Sun/Sky system.

Additional Media
Sketchfab low poly version. This was reduced from 3.7 million faces down to 228k. I don’t have a pro account so have to upload low poly versions.
Metashape – Shows cameras, point clouds and details.
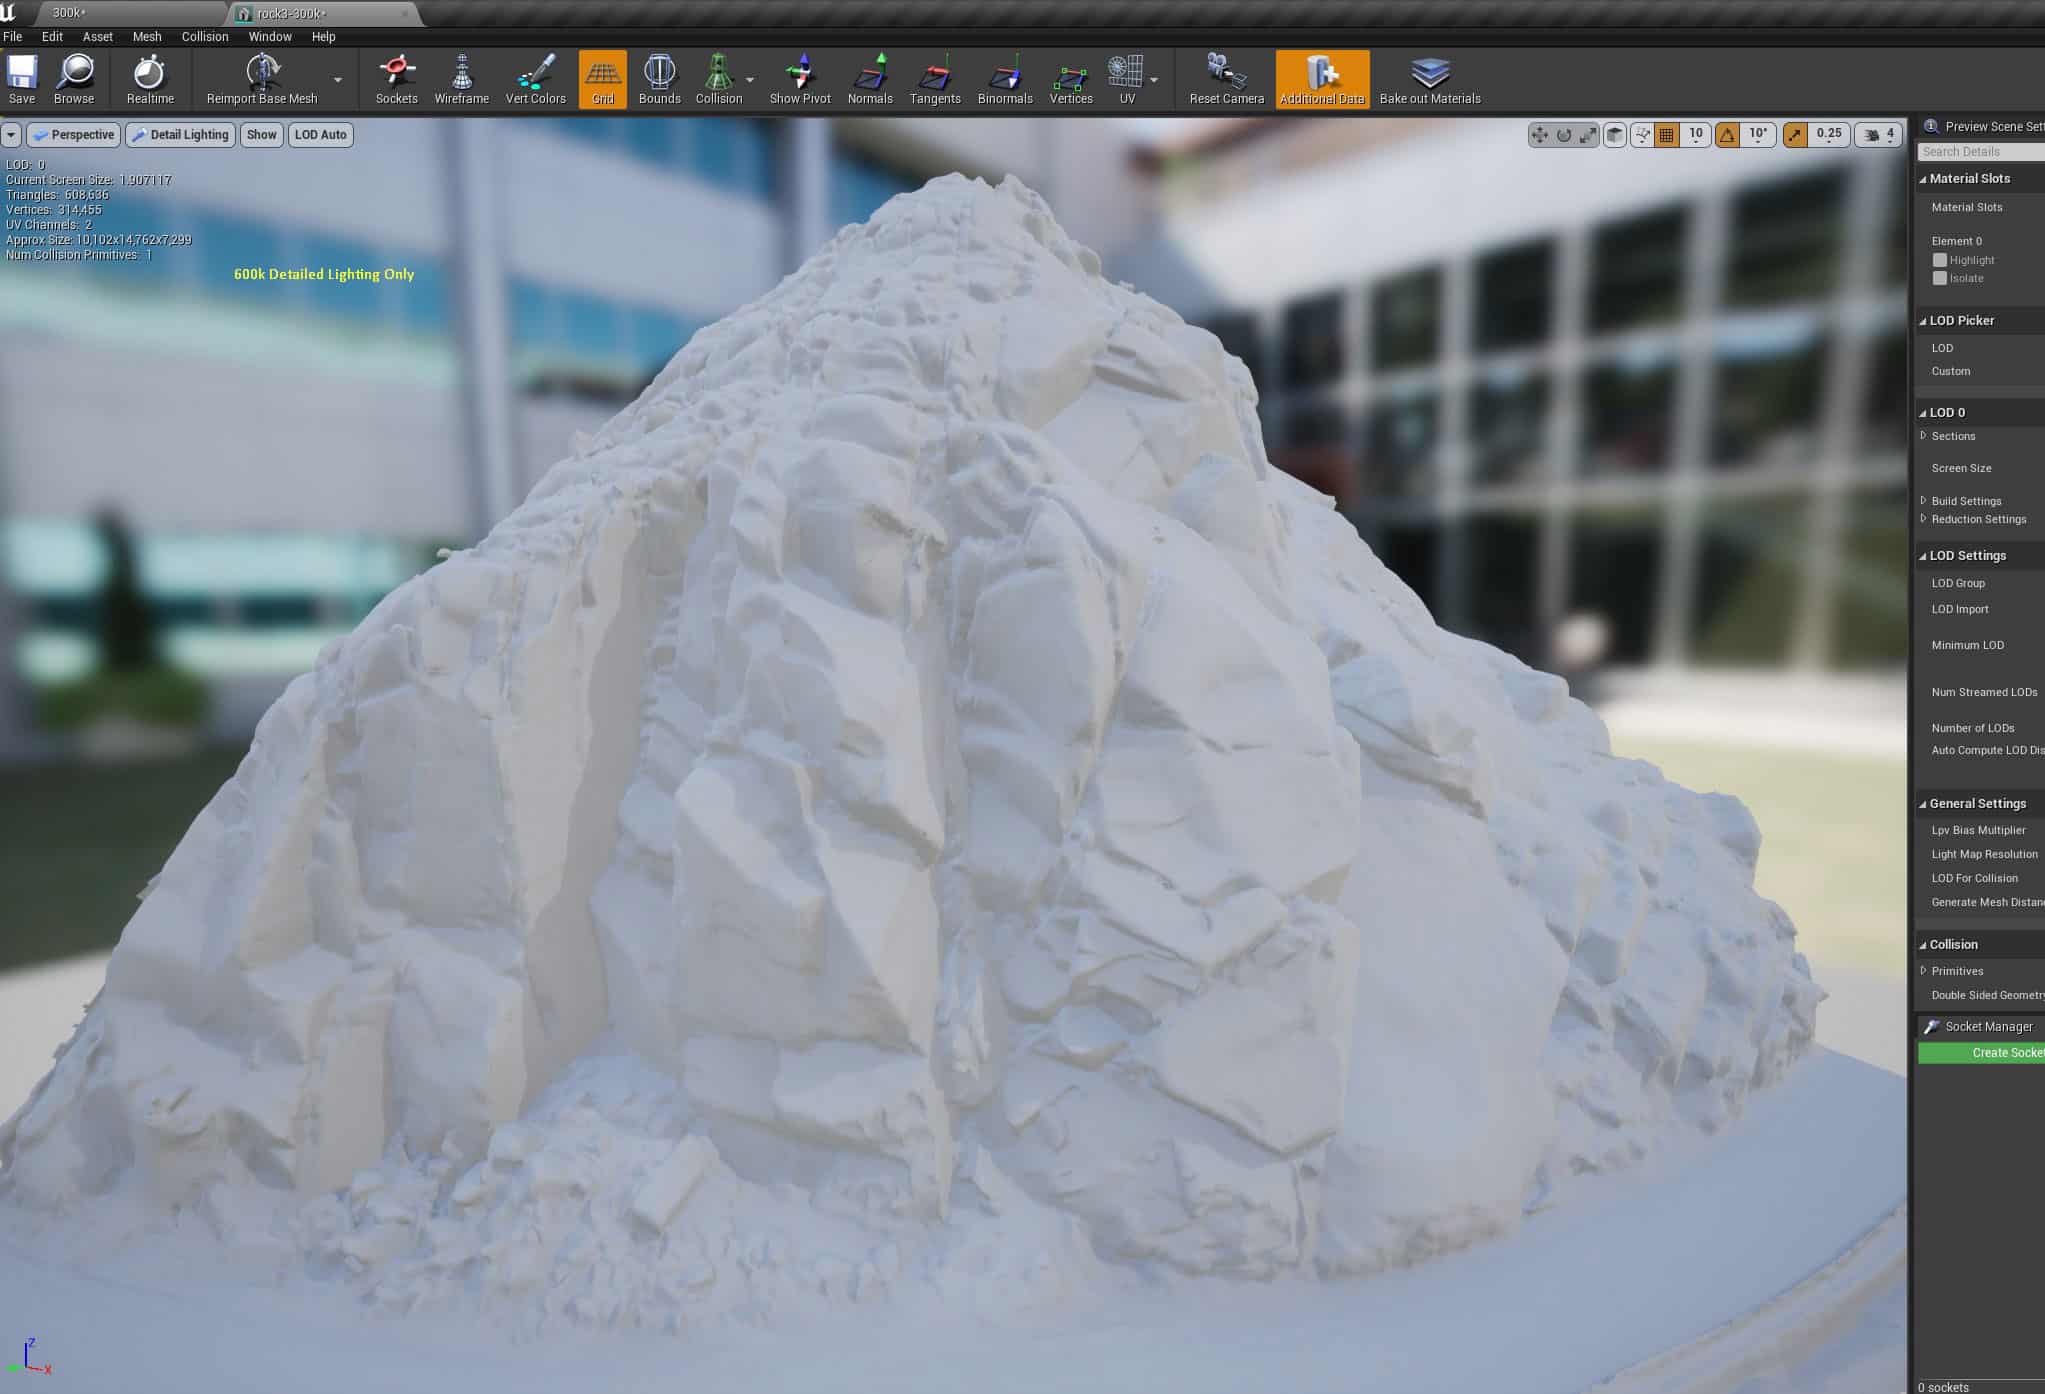
The video below shows the final result in Unreal Engine, this version of the model is 600k faces.
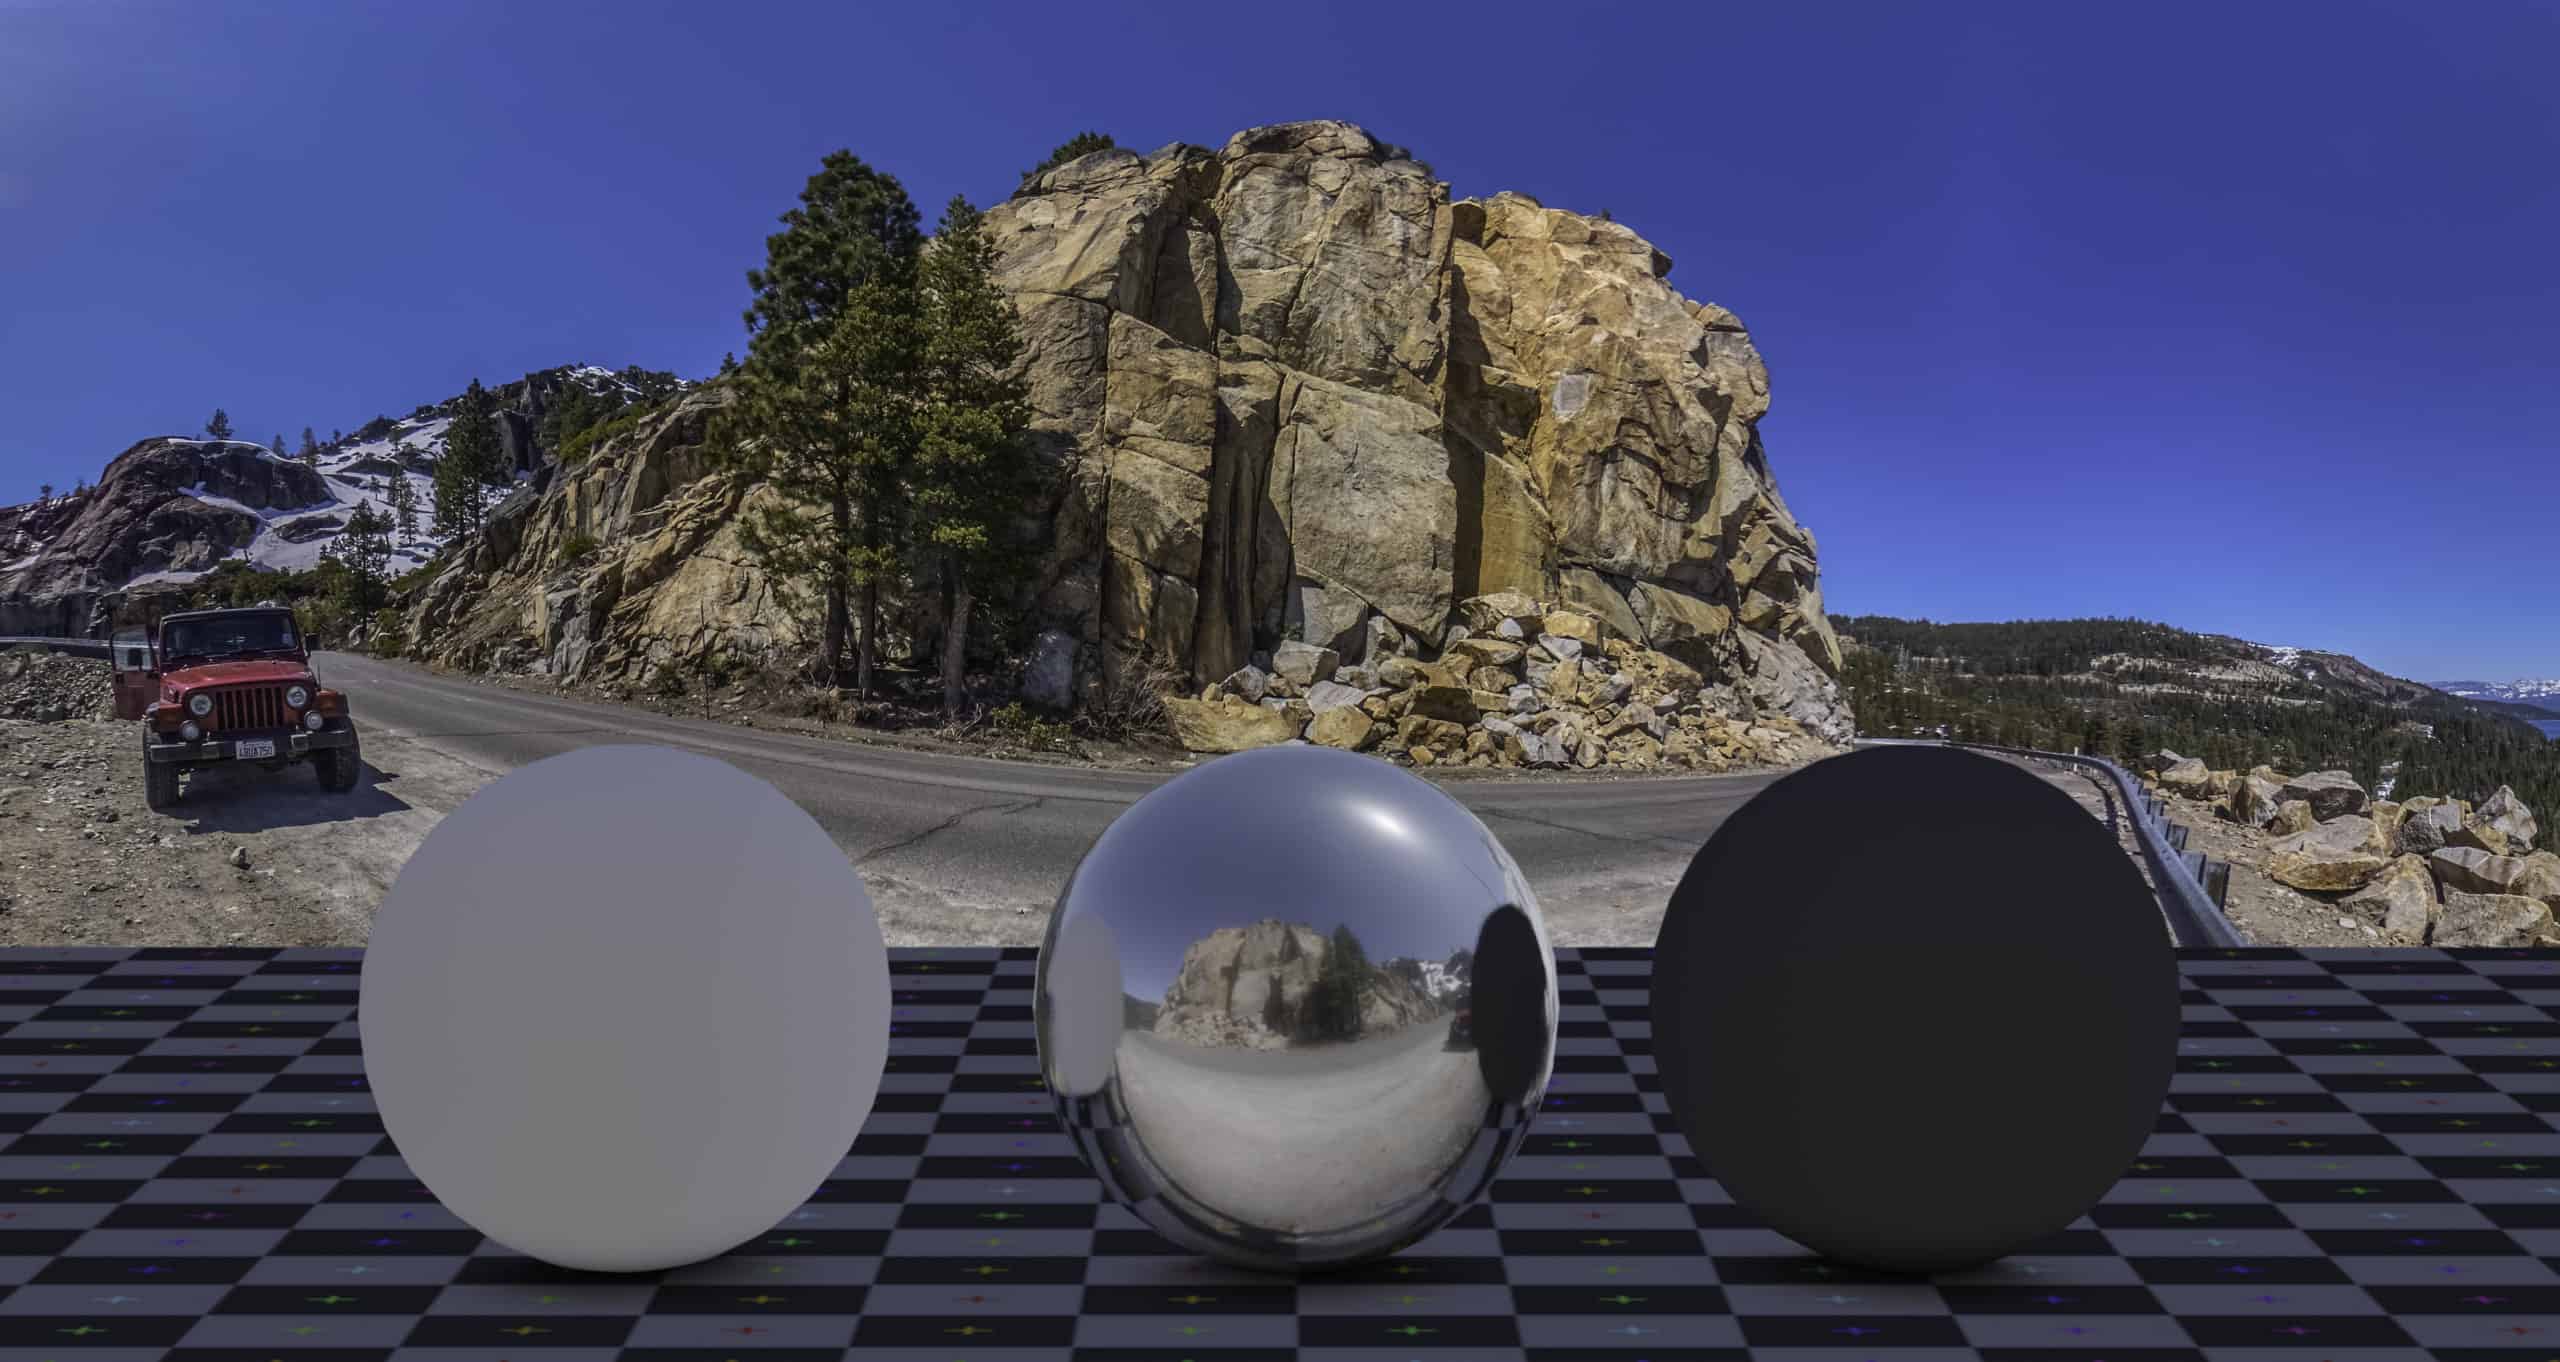
I also created my own ground 360 HDRI which is composed of 9 images +/-4 EV.
Long story and many screenshots later I hope that I have helped someone see what my personal workflow is of scanning with my drone, the process to build the mesh, optimize, bake and then bring it finally into a game engine.
If you have any questions leave a comment and if you want a 3-4 part video of this whole process let me know and If I get enough requests I will do so.